Of course, yes, adding new Articles in WordPress can be a daunting task for many business blogging sector novices. However, the power of fresh, high-quality content cannot be underestimated. Whether you’re a blogger, a business owner, or a passionate enthusiast, your WordPress website’s lifeblood lies in its articles. Every new blog is a chance to engage, inform, and inspire users.
But why are these articles so vital, and how can you make the most of WordPress’s versatile platform to create them? That’s precisely what we’ll unravel in this comprehensive guide. Picture your WordPress website as a dynamic canvas, where every article is a brushstroke of insight, color, and innovation. Each new piece you add contributes to the evolving tapestry of your online presence.
One thing is sure: Articles are the building blocks that capture the essence of your message, establish your authority in your niche, and drive traffic. Moreover, they are pivotal in keeping your website’s content fresh and relevant—a critical factor for search engine optimization. New articles don’t just serve as informative resources; they also foster a sense of community and interaction.
Regular updates give your visitors a reason to return, engage, and share your content. This heightened engagement can increase user retention, brand loyalty, and a growing online influence. In an age where information is king, your website can reign supreme by constantly enriching itself with new articles. We’ll guide you through adding, optimizing, and managing blog content effectively.
Understanding How WordPress Dashboard Empowers The Blog Posting Process
Adding fresh blog articles to your website isn’t just beneficial; it’s imperative. Whether you’re a seasoned content creator or just taking your first steps into online publishing, this guide will equip you with the knowledge and skills to make your WordPress website a thriving hub of informative and engaging articles. But if you don’t have any experience, first learn how to build a blog in this video:
First, WordPress.com offers best-in-class hosting and two different dashboards you can use, depending on which one you prefer. They include the WordPress.com dashboard and the WP Admin (considered the classic WordPress dashboard). Secondly, while you can do almost everything in your main WordPress.com dashboard, you can also switch to WordPress Admin if that is your preference.
When you first log in to your WordPress.com account, you will see the Default WordPress.com Dashboard field. The WordPress dashboard is the control center of your website, where you manage and oversee all aspects of your online content. It’s the first screen you see when logging into your WordPress admin area. Think of it as the nerve center that helps control various options.
As well as customize your website’s appearance, functionality, and content. You can also access WP Admin by adding /wp-admin to the end of your website URL, such as yourgroovysite.wordpress.com/wp-admin or yourgroovydomain.com/wp-admin. With that in mind, there are various essential components of the WordPress dashboard that blog content writers should know about.
They Include:
- Admin Bar: The admin bar runs across the topmost website section when logged in with quick-access toolbars.
- Dashboard Home: This is the leading WordPress landing (dashboard) page with your website activities/stats overview.
- Blog Posts: Create, manage, and organize your articles. Add new posts, edit existing ones, and categorize or tag them.
- Media Files: Manage your media files, including images, videos, and documents. Upload, edit, and insert media into articles.
- Website Pages: Unlike posts, pages are typically used for static, unchanging content such as ‘Contacts’ or ‘About Us’ web pages.
- Comments Field: Monitor and moderate comments on your posts. Approve, reply to, or delete words as you engage with users.
- Theme Appearance: Your website design customization section. Change theme options and customize headers/menus/widgets.
- Website Plugins: Add additional website add-on functionality. You can install, activate, deactivate, and manage plugins here.
- Users Section: Manage user accounts, roles, and permissions on your website. You can also edit your profile here.
- Webmaster Tools: Various tools to import and export content — may include options to check the performance of your website.
- Custom Settings: Main section to configure settings (topic title, tagline, and permalink structure). Vital for SEO/website behavior.
- Updates Area: WordPress, themes, and plugins periodically offer new updates to enhance your website security and functionality.
It’s worth noting that the Admin Bar provides quick access to critical functions, like adding a new post, editing user profiles, or viewing your website. In addition, you can customize the main website dashboard (landing page) to display widgets that matter the most. Likewise, you’ll also discover a collection of plugins and add-ons carefully selected to enhance your website and unleash creativity.
As mentioned, there are several quick actions you can perform right within the Admin Dashboard, as shown in the image above.
Other quick admin actions:
- Click on Screen Options to select the elements you want to show in your WP Admin dashboard.
- You can Show or Hide At A Glance, Activity, or Quick-Draft using the Admin Dashboard options.
- At a Glance displays a summary of the content on your site and identifies which theme you are using.
- Activity: Upcoming/scheduled posts, recently published posts, and the most recent comments — you can moderate them.
- Quick Draft: It lets you quickly create a new post and save it as a draft. It also links the three most recently drafted posts.
- You can click on those links to edit the draft posts or access them by navigating to Posts → All Posts → Drafts.
- You may click on Help to access quick tutorials on navigating the Admin Dashboard and get additional support if needed.
At the same time, you can click on any of the three arrows to move the current box element up or down or toggle to shut it. Additionally, you can also click and drag any boxes to move them into a different position. The things you can do here are limitless.
The Simple Step-By-Step Instructions For Adding Articles In WordPress
As illustrated above, understanding these critical components of the WordPress dashboard is fundamental to managing and customizing your website effectively. In the subsequent sections of this guide, we will delve deeper into how to use these features to add new articles and enhance your WordPress website’s performance. Be that as it may, you can save time by watching this video:
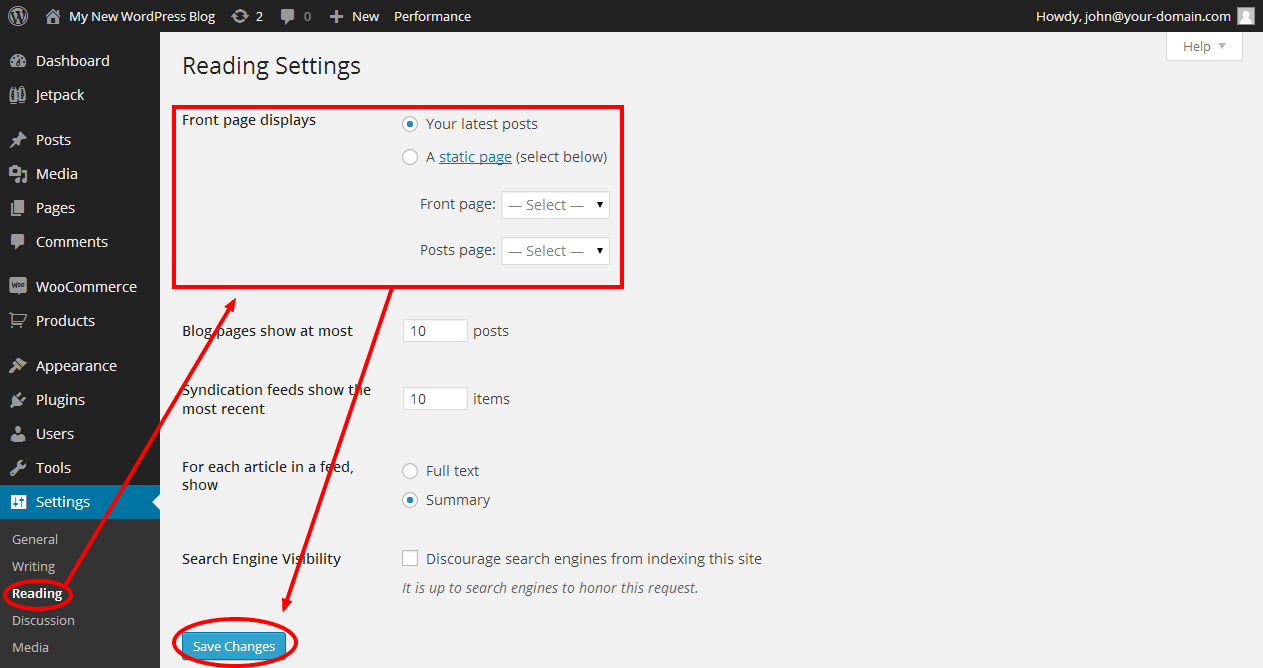
For newcomer bloggers or professional content writers, once your WordPress website blog is ready, it’s time to flex those writing muscles! Remember, as you create blog post content, your new articles will continuously be published on your website blog page. However, you can designate which page is your blog page. Luckily, the process to achieve this is relatively straightforward.
Consider the following steps:
- Log into your WordPress website dashboard.
- Go to Settings.
- Select the Reading option.
- Modify or confirm what is being displayed on your front page.
- Your Latest Posts: This is the default setting. Your home page shows your blog posts.
- A Static Page: This will swap out your home (blog) page for a static page and instead display blog posts on the static page.
- Click the ”Save Changes” button. That’s it!
Note: Do not have your ‘home page’ and ‘posts page’ on the same page as WordPress requires. It may impact on your website.
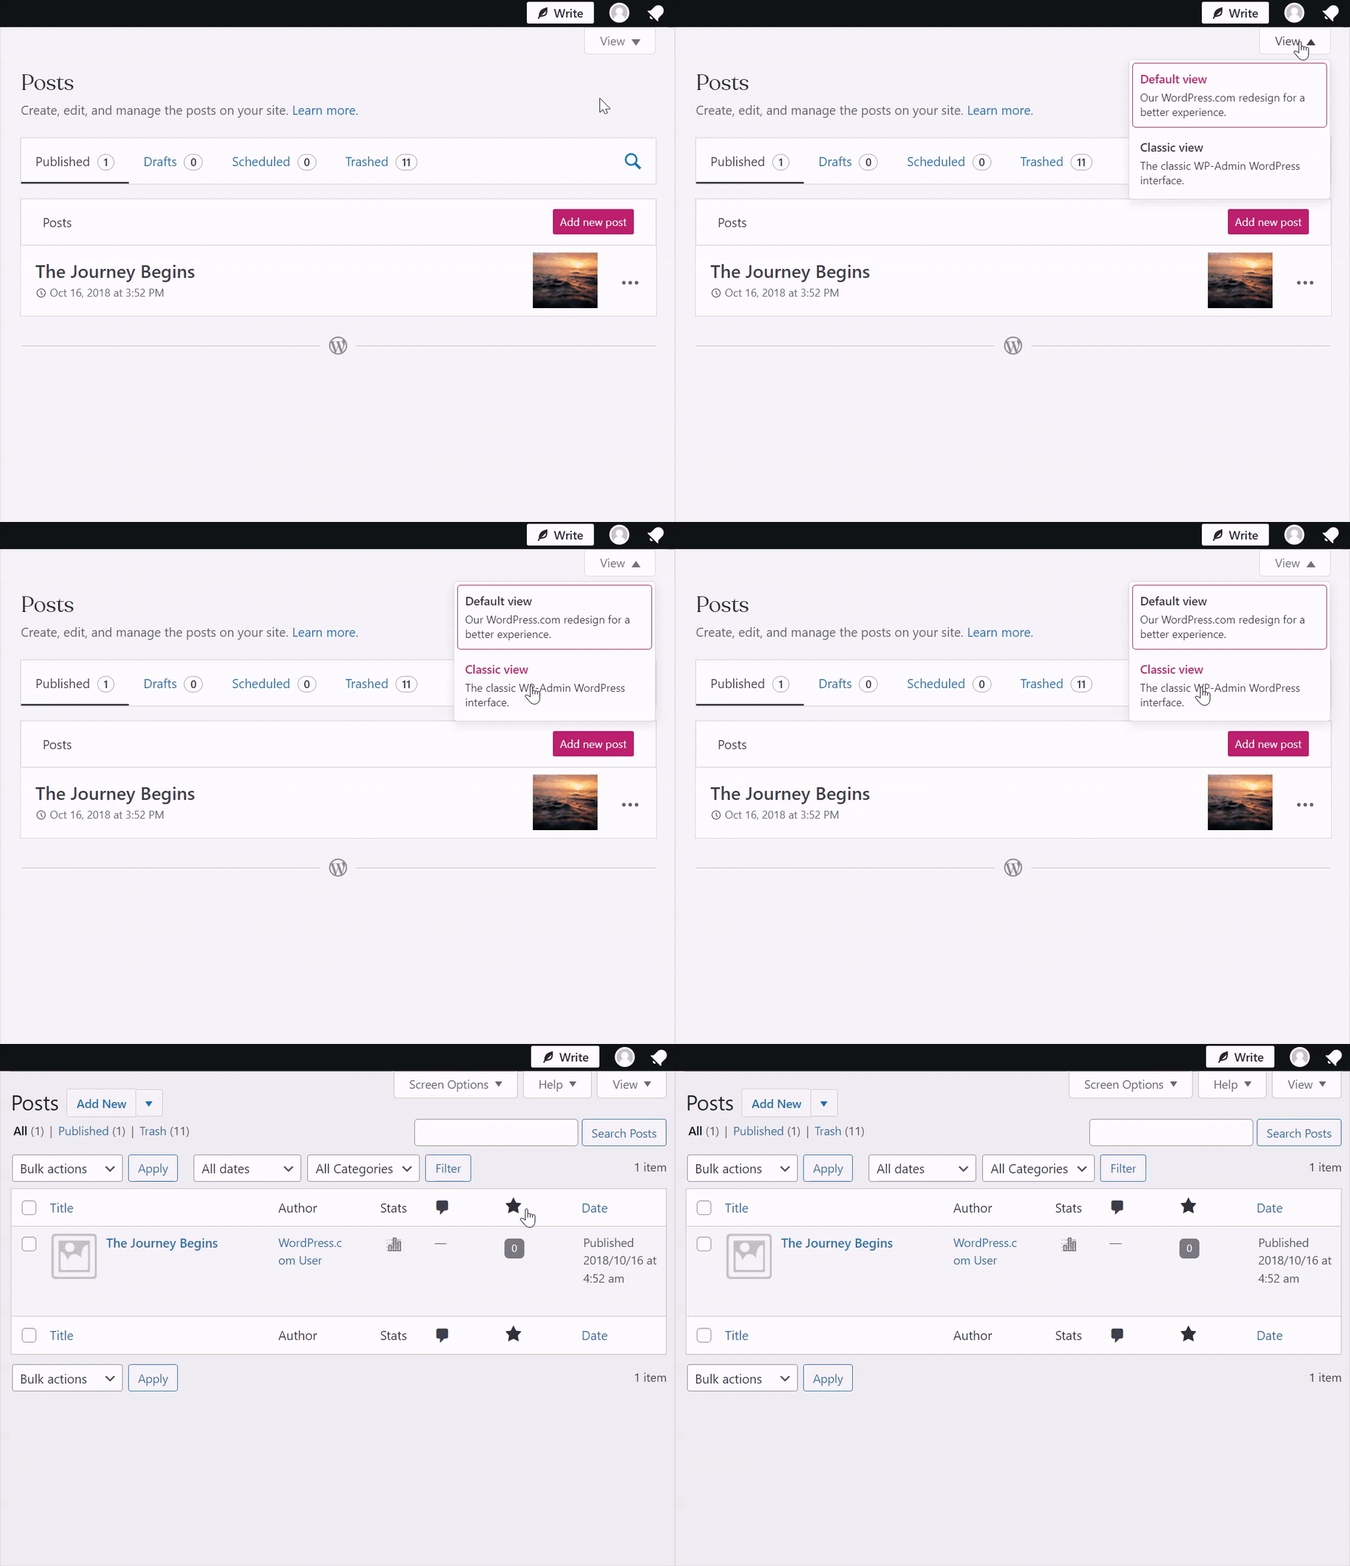
Equally important, to view the classic WordPress Admin version of any screen, you can click on the ‘View‘ tab in the upper right corner and select “Classic View, “ as shown in the illustration image below. In other words, it’s an Animated GIF showing the clicking of the View tab and selecting Classic View to switch from the WordPress.com dashboard to the WordPress Admin dashboard.
If you do not have the ‘View‘ tab, check to ensure “WordPress.com Log In” is set to the ON position at Settings → Security → WordPress.com Log In. In addition, the Classic Editor is accessible by following the simple steps for beginner webmasters. When you switch to the Classic View, it will not change back to the Default View unless you intentionally return with the ‘View‘ tab.
Equally important, you can control the view on a screen-by-screen basis. For example, switching to Classic view on Pages will not change the ‘View‘ option on the Posts screen. Remember, switching to the Classic View option on Posts is a separate action. On that note, below are the simple steps to guide you through the WordPress website blog post content creation and blogging process.
Step 1: Access The Dashboard
- Log in to your WordPress admin area using your username and password.
- After logging in, you’ll be on the WordPress dashboard.
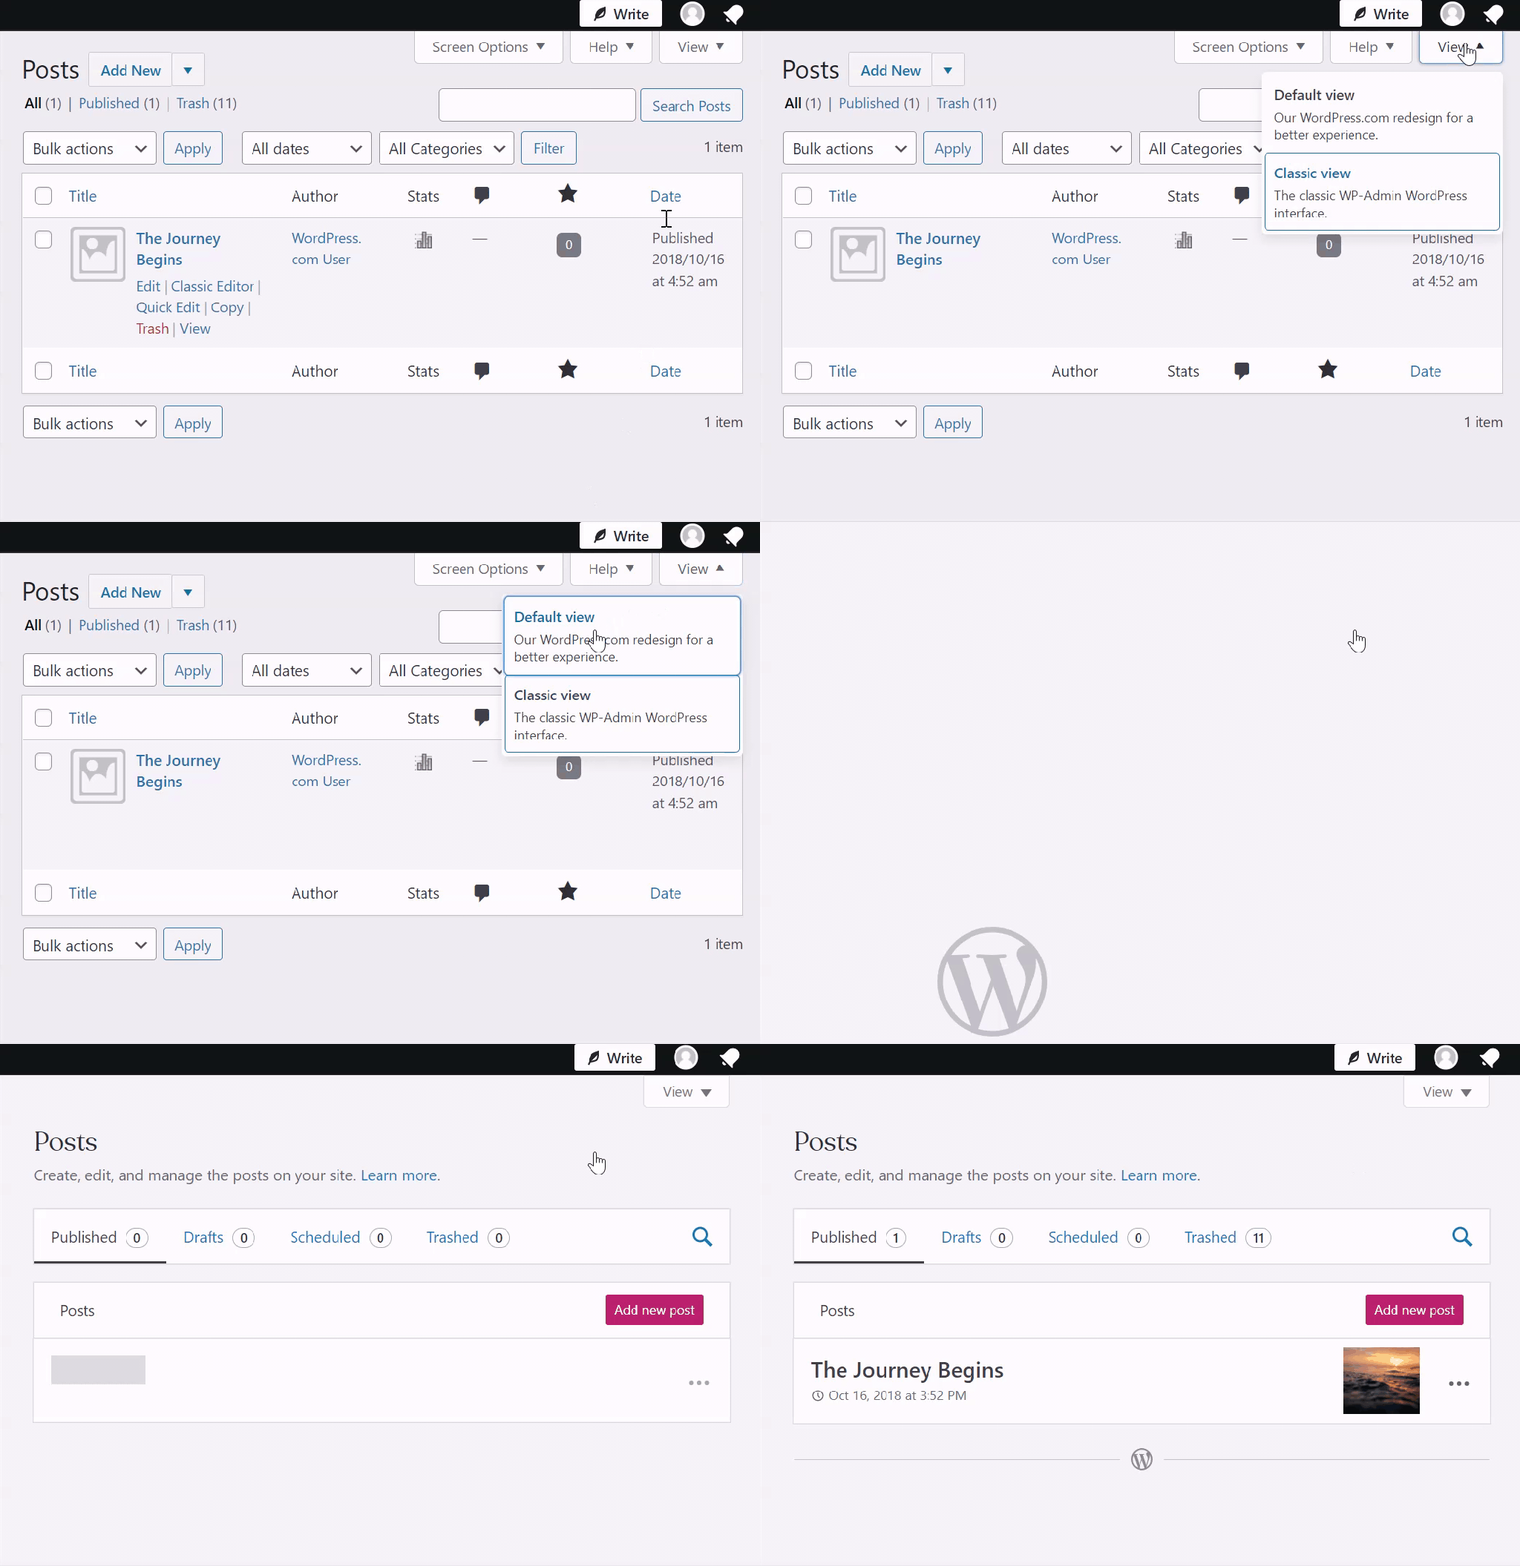
It’s worth mentioning that after switching to the Classic WordPress Admin View, you can return to the Default WordPress.com View for your website. Remarkably, you can do this by clicking the ‘View‘ tab (upper right corner) and selecting the Default View option:
Note: Above is an Animated GIF showing clicking View and selecting WordPress.com View to help return to the Default View mode.
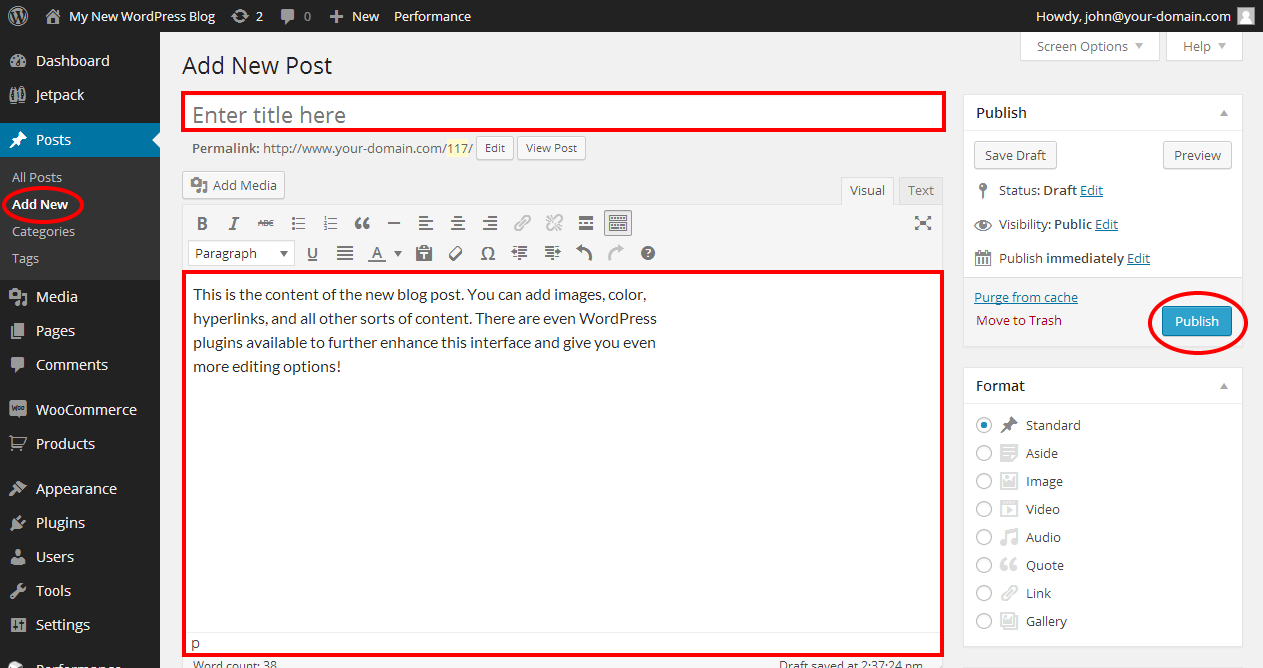
Step 2: Create A New Post
- In the left-hand menu, click “Posts” to access the Posts section.
- To create a new article, click on “Add New.”
Step 3: Adding Content
- You’ll be directed to the WordPress block editor.
- Here, you can start adding content to your new article.
- Give your post a title by clicking the “Add title” field.
- Begin adding your article’s content in the main editing area.
- You can type or paste your text directly.
- Use the block editor’s formatting options to style your text and add headings, lists, and other elements.
- Select the text and use the toolbar that appears.
Step 4: Adding Media
- To add images or other media, click the (+) button to insert a new block.
- Choose the “Image” block to upload and insert images into your article.
- You can also embed videos and other media using specific blocks.
Step 5: Saving Drafts
- As you work on your article, click the “Save Draft” button to save your progress.
- Although WordPress will automatically do it, it’s a good practice to save your work regularly to avoid any loss of content.
Step 6: Categories And Tags
- Yes! There are Tags and Categories in blogging—very essential elements.
- On that note, in the right-hand sidebar, you’ll find the “Document” settings.
- To assign categories to your article, click “Categories,” you can either select existing categories or create new ones.
- To add tags, click “Tags,” you can enter relevant keywords or phrases to help organize your content.
- Categories and tags help readers and search engines find and navigate your content effectively.
Step 7: Preview And Publish
- To preview your article, click the “Preview” button. This allows you to see how your post will look to your readers.
- Once satisfied with your article, click the “Publish” button to make it live on your website.
- You can publish or schedule it for a future date by clicking “Edit” next to “Publish immediately.”
Step 8: Editing And Updating
- You can always edit and update your articles by going to the “Posts” section in the dashboard and selecting the post you want to modify. Make your changes and click “Update.”
Congratulations! Up to now, you’ve successfully added a new blog post article to your WordPress website! Realistically, by following these simple steps, you can create, format, and publish engaging content, making your website a valuable resource for your audience.
Tips To Get Started With The Block Editor To Optimize Articles In WordPress
Unlike the WordPress Classic Editor, the WordPress Block Editor, often called “Gutenberg,” is a user-friendly and powerful tool for creating, formatting, and organizing content. It was introduced in WordPress 5.0 and has since become the standard content editor for the platform. The WordPress block editor is a versatile and user-friendly tool that empowers creative content creators and bloggers.
In particular, it empowers them to format and organize their website blog articles efficiently. With a wide range of block types and formatting options, you can craft visually appealing, well-structured content that engages your readers and conveys your message effectively. Whether you are a beginner or an experienced writer, it offers a platform where your creativity and ideas can shine.
1. Block-Based Content
The block editor divides your content into individual “blocks.” Each block can contain different types of content, such as paragraphs, headings, images, videos, lists, and more. This block-based approach allows you to create a well-structured and visually appealing article.
2. Drag-And-Drop Editing
One of the standout features of the block editor is its drag-and-drop functionality. You can quickly move, rearrange, and reorganize blocks within your content. This flexibility makes it simple to change the order of elements and create visually appealing layouts.
3. Rich Text Formatting
The block editor provides a range of text formatting options similar to what you’d find in a word processor. You can apply bold, italic, underline, strikethrough, and text color to your text with ease.
4. Headings And Paragraphs
You can select from various heading sizes and paragraph styles to give your content a structured and organized appearance. Proper headings improve readability and help search engines understand the hierarchy of your content.
5. Lists And Quotes
The block editor supports the creation of bulleted or numbered lists, making it easy to organize information. You can also use the block quote feature to emphasize important text or quotes within your articles.
6. Media Files Embedding
You can effortlessly embed media from popular platforms like YouTube, Twitter, and Instagram. Paste the URL, and the block editor will automatically embed the media files. This feature enhances your content with multimedia elements.
7. Images And Galleries
Adding images is a breeze with the image block. You can also create image galleries and add captions, providing an attractive visual component to your articles.
8. Widgets And Embeds
The block editor includes widgets and embeds, allowing you to add elements like calendars, contact forms, and more. These blocks make it easy to integrate external content or interactive features within your articles.
9. Custom HTML And Code
For advanced users, there’s a “Custom HTML” block that enables you to insert HTML code or custom CSS to fine-tune your content. This is useful for those who want more control over their article’s appearance and functionality.
10. Reusable Blocks
The block editor allows you to save and reuse blocks or groupings of blocks as templates. This feature streamlines your content creation process, as you can replicate elements across your site without manual recreation.
In layman’s language, you can not shine by only having the WordPress website block editor (Gutenberg) at your fingertips — you need a few more chops to optimize your content. Fortunately, the above simple explanations of the block editor and its critical features for formatting and organizing your content will help you. It’s time to start shining with your website blog posts and article content!
The Search Engine Optimization Features To Power Your Articles In WordPress
Optimizing your articles for search engines is a critical aspect of content creation, as it can significantly impact your website’s visibility and discoverability. With that in mind, in the next section, we’ll highlight the importance of SEO (Search Engine Optimization), including adding meta descriptions and using relevant keywords. As a result, this will help you further optimize your blog posts or articles.
1. Enhanced Visibility
Generally speaking, effective SEO techniques, such as optimizing for keywords and adding meta descriptions, improve your article’s chances of ranking higher in the Search Engine Results Page (SERP) for the likes of Google, Yahoo, Yandex, Bing, DuckDuckGo, etc. In addition, this increased reputation awareness visibility can lead to more organic traffic to your website.
2. Targeted Audience
- Your target audience refers to the consumers most likely to want your product or service and, therefore, the people who should see your ad campaigns. SEO allows you to target specific keywords and phrases your potential audience is searching for. By aligning your content with these search queries, you can attract visitors who are genuinely interested in your topic or niche.
3. Improved Experience
- In website development, SEO best practices often overlap with good User Interface (UI) and User Experience (UX) design principles. For example, clear and relevant meta descriptions not only help search engines understand your content but also inform users about what to expect when they click on your article. This reduces bounce rates and keeps readers engaged.
4. Increased Credibility
- High-quality, well-optimized content is seen as more credible by both search engines and users. It demonstrates your expertise and authority in your field, which can lead to more backlinks from other websites, further enhancing your SEO.
5. Competitive Advantage
- Many websites and blogs are vying for attention in search results. By implementing solid SEO strategies, you can gain a competitive edge in your niche and potentially outrank competitors.
6. Structured Content
- Keyword optimization encourages you to structure your content logically, with clear headings and subheadings. This improves the readability of your articles, making them more appealing to readers and search engines.
7. Consumer Intent
- When you focus on relevant keywords, you’re more likely to align with user intent. Understanding what your audience is searching for and delivering content that satisfies their needs can boost your SEO efforts.
8. Meta Descriptions
- A well-crafted meta description provides a concise summary of your article in the search results. It acts as an advertisement for your content, enticing users to click through to your website. It’s an opportunity to showcase your content’s relevance and value.
9. Keyword Research
- Thorough keyword research helps you identify the phrases and terms your target audience is using. By incorporating these keywords naturally into your content, you improve your chances of ranking for relevant search queries.
10. Limitless Benefits
For a successful website content optimization process, effective SEO is an investment that pays off over time. Once your content ranks well, it can continue to drive organic traffic for months or even years as long as it remains relevant and up-to-date.
In other words, incorporating SEO Best Practices, including adding meta descriptions and using relevant keywords, is an essential process. For one thing, it helps ensure that your hard work in creating valuable content reaches a broader audience. Likewise, it’s a vital component of successful content marketing and an integral part of growing and maintaining your digital online presence.
Utilizing Post Categories To Optimize Your Blog Articles In WordPress
A. Logical Organization
Categories are used to group related articles together. Create blog categories that make logical sense for your content. For example, if you run a cooking blog, you might have categories like “Appetizers,” “Desserts,” “Main Dishes,” etc.
B. Create Categories
In the block editor, you can add or edit categories in the right-hand sidebar under “Document” settings. To create a new category, click “Add New Category” and enter the name. You can also manage blog categories by going to “Posts” > “Categories” in the WordPress dashboard.
C. Assign Categories
When creating or editing a post, you can assign it to one or more categories. Choose the most relevant categories from the list.
D. Optimize Hierarchy
WordPress allows you to create hierarchical category structures. For instance, you can have a top-level category like “Recipes” and sub-categories like “Breakfast,” “Lunch,” and “Dinner” under it.
As a rule of thumb, effectively categorizing and tagging your articles in WordPress is essential for improving elements like website menu, layout navigation, Call To Action (CTA) button response, user experience, and SEO. The above steps are a great starting point.
Utilizing The Contextual Tags To Optimize Your Blog Articles In WordPress
i. Detailed Descriptors
Tags provide more specific descriptors for your articles. They allow you to highlight keywords or phrases that are relevant to the content. For example, for a dessert recipe, you might use tags like “chocolate,” “cake,” “gluten-free,” etc.
ii. Adding Tags
In the block editor, you can add or edit tags in the right-hand sidebar under “Document” settings. To add a new tag, click “Add New Tag” and enter the tag’s name. You can also manage tags by going to “Posts” > “Tags” in the WordPress dashboard.
iii. Multiple Tags
You can assign multiple tags to a single post, primarily when your content covers various topics or has numerous keywords.
How Effective Categorization And Tagging Empowers Your Blogging Plan
A. Improved Navigation
Categories and tags help visitors find related content easily. This enhances user experience and encourages them to explore more of your articles.
B. SEO Benefits
Categorization and tagging contribute to SEO by making your content more discoverable. Search engines can better understand the structure and relevance of your content, potentially leading to higher rankings for specific keywords.
C. Internal Linking
Categorization and tagging naturally lead to internal linking. By linking related articles within your content, you improve site navigation and help distribute link authority across your website.
D. Reduced Bounces
When users find what they’re looking for and discover more relevant content on your site, they are less likely to “bounce” back to search results. This reduces your bounce rate, a positive signal to search engines.
E. Optimized Archives
WordPress automatically generates category and tag archive pages that list articles within each category or tag. These pages can rank in search results and bring additional traffic to your site.
F. Quality URLs
Properly categorized and tagged posts often result in SEO-friendly URLs that include the category or tag name, which can further boost your search engine rankings.
As mentioned, website categories and tags are vital for organizing content, improving navigation, and ranking. By thoughtfully applying them, you’ll structure a user-friendly website that’s easier for visitors and search engines to understand and navigate.
The Topmost Essential Article Draft Elements For Your Website Blog Posts
1. Creating Drafts
When you start working on a new article in the block editor, you can save it as a draft at any point by clicking the “Save Draft” button in the upper-right corner.
2. Auto-Saving
WordPress has an auto-save feature that periodically saves your work. However, it’s a good habit to keep manually to ensure your progress is preserved.
3. Temporary Storage
Drafts act as a temporary storage space for your content. You can leave a partially completed article and return to it later for further editing.
4. Private Drafts
If you want to keep your draft hidden from others, you can set it to “Private” so only you can see and edit it.
5. Posts Scheduling
You can schedule the publication of your draft for a future date or time. This is useful if you want to plan your content.
Of course, utilizing drafts and revisions in WordPress is a valuable practice for saving and editing your work. At the same time, it ensures that your content remains well-organized and error-free. The above tips will help make the most of drafts and revisions.
The Essential Article Content Revision Elements For Your Website Blog Posts
i. Version History
Revisions are versions of your articles that WordPress saves whenever you make changes to a published post. It keeps a history of your edits.
ii. Accessing Revisions
To access revisions, open the post you want to edit or view. In the block editor, go to the right-hand sidebar under “Document” settings and click “Revisions.”
iii. Comparing Revisions
In the revisions interface, you can compare different article versions to see what changes were made. You can also see who made the changes if your site has multiple contributors.
iv. Restoring Revisions
If you want to revert to a previous version of your article, you can click on a revision and then choose “Restore This Revision.” This is particularly useful if you’ve made edits that you later regret.
v. Frequent Saves
Save your work as drafts regularly to prevent data loss in case of technical issues or accidental browser closures.
vi. Version Control
Revisions can be an excellent tool for tracking changes, especially in collaborative environments. They help maintain content integrity and transparency.
vii. Content Experiments
You can use drafts to experiment with different ideas, structures, or styles without affecting your published content. This can be particularly useful for A/B testing.
viii. Content Calendar
Plan and organize your content by scheduling drafts to publish on specific dates, ensuring a consistent posting schedule.
ix. Backup And Restore
Revisions act as a backup of your content history. In case of accidental content loss, you can restore a previous revision to recover your work.
By all means, incorporating drafts and revisions into your content creation workflow is an essential practice. In most cases, it helps enhance productivity, minimizes errors, and provides valuable oversight for collaborative writing. Additionally, these options allow you to work on your content at your own pace while maintaining a polished, error-free, and well-structured online presence.
The Topmost Effective Previewing Strategy For Your Website Blog Posts
1. Create New Or Edit
In the WordPress dashboard, navigate to “Posts” and select the article you want to work on or create a new one by clicking “Add New.”
2. The Block Editor
Use the block editor to write, format, and add media to your article.
3. Saving As Draft
To save your progress, click the “Save Draft” button located in the upper-right corner of the screen. This ensures your work is securely stored, and you can return to it later.
4. Previewing The Article
If you want to see how your article will appear to readers, click the “Preview” button. This opens a new tab or window with a preview of your article.
5. Review And Adjust
In the preview mode, carefully review your article for any formatting or content issues. Make any necessary adjustments in the block editor if you spot errors or want to improve.
6. Return To Editor
Close the preview tab or window to return to the block editor if you need to continue editing.
As you can see, previewing and publishing website blog post articles in WordPress is a straightforward process. Furthermore, you can also schedule publication for a future date. The above step-by-step descriptions of how to preview and publish your articles will help.
The Most Essential Publishing Elements For Your Blog Articles In WordPress
A. Final Edits And Checks
Before publishing, double-check your article for spelling and grammar errors, formatting, and other issues affecting its readability and user experience.
B. Status And Visibility
In the right-hand sidebar under “Document” settings, you’ll find options related to the status and visibility of your article. By default, your article is set to “Draft,” meaning it’s not visible to the public.
C. Publishing Immediately
To publish your article immediately, click the “Publish” button. Your article will be live on your website for everyone to see.
D. Scheduling Publication
To schedule the publication for a future date or time, click “Edit” next to “Publish Immediately.” Choose the date/time you want your article to be published, and then click “OK.” This will help you schedule blog posts to convenient timelines.
E. Publish Or Update
After scheduling or making changes, click the “Publish” button. Your article will be published automatically at the specified time.
F. Confirmation Message
Once your article is published, you’ll see a confirmation message. You can view your live article by clicking the provided link.
G. Sharing And Promotion
After publishing, consider sharing your article on social media and other promotional channels to increase its visibility.
By following these steps, you can easily preview, publish, and even schedule the publication of your blog articles. This process ensures that your content is well-prepared and presented to your audience at the right time, whether you’re sharing immediate news or planning your content strategy for the future. Indeed, there are some common issues users may encounter while blogging.
Troubleshooting And Fixing Issues With Your Website Articles In WordPress
1. Formatting Issues
- Issue | Text formatting may appear inconsistent or break when copying and pasting content from other sources.
- Solution:
- Use the “Paste as text” or “Paste from Word” options in the block editor to strip away unwanted formatting.
- Manually adjust the formatting as needed.
2. Missing Editor
- Issue | The visual editor may not load correctly, or it may show a white screen.
- Solution:
- Try disabling browser extensions that may interfere with the editor.
- Clear your browser cache or use a different browser if the issue persists.
- Ensure your browser is up to date.
3. Media Errors
- Issue | You may encounter problems when uploading images or other media files.
- Solution:
- Check your media file types and sizes.
- If your file format is unsupported, convert it to a compatible format.
- Verify your file size isn’t too large, and consider optimizing images for the web before uploading.
4. Broken Backlinks
- Issue | Links within your articles may become broken if the URL changes or the linked page is deleted.
- Solution:
- Regularly review and update links in your articles.
- Use a link checker plugin to identify and fix broken links.
5. Inadequate Optimization
- Issue | Articles may not rank well in search engine results due to insufficient SEO optimization.
- Solution:
- Research relevant keywords and incorporate them naturally into your content.
- Write compelling meta descriptions for better click-through rates.
- Utilize SEO plugins like Yoast SEO or All in One SEO Pack for guidance.
6. Accidental Deletion
- Issue| Your work may be lost due to accidental deletion, browser crashes, or technical errors.
- Solution:
- Regularly save your work as drafts to prevent data loss.
- You can also use a backup plugin to automate regular backups of your content.
7. Slow Performance
- Issue| Adding multiple large images and media files can slow down your website’s performance.
- Solution:
- Optimize images for the web before uploading.
- Consider using a Content Delivery Network (CDN) to speed up media loading times.
8. Content Duplication
- Issue| You may unintentionally create duplicate content, which can harm SEO.
- Solution:
- Use the canonical tag or rel=”canonical” to indicate the source of the content if necessary.
- Regularly audit your content to merge or delete duplicates.
9. Unscheduled Publishing
- Issue| Your article may be accidentally published without you intending to do so.
- Solution
- Double-check the publication status and date in the right-hand sidebar before clicking “Publish.”
- If you schedule publication, ensure the date and time are set correctly.
10. Broken Styling and Design
- Issue| Changes in formatting and design may occur when switching between visual and text editors.
- Solution:
- Familiarize yourself with both editors.
- Use the text editor to make precise code-based changes when necessary.
- Regularly review your content to catch and correct any design issues.
By addressing these common issues and following the provided solutions, you can ensure a smoother and more productive experience when adding new articles in WordPress, ultimately enhancing the quality and effectiveness of your content. Next, there are a few essential resource applications, plugins, and tools that can further assist in creating and optimizing Articles in WordPress.
Other Additional Resources To Optimize Website Articles In WordPress
1. SEO Plugins
To fully optimize your content, you’ll need a partner. As such, All-In-One-SEO (AIOSEO) and Yoast SEO are popular WordPress SEO Plugins that help you optimize your articles for search engines. It provides valuable tools for keyword optimization, readability analysis, and meta-description management, ensuring your articles are search engine-friendly and user-friendly.
2. Graphic Tools
You can’t have a great post without complementing it with attractive images. That’s where graphic design software tools come in. For example, Canva is a versatile graphic design platform that offers an array of templates and tools for creating eye-catching images and graphics to enhance your articles. It’s beneficial for custom-featured images and social media graphics.
3. Paraphrasing Tools
Technically, Paraphrasing Tools are free online rewording applications to rephrase words, sentences, and paragraphs using cutting-edge AI algorithms. Perse, the Grammarly App is a writing assistant tool that checks your content for spelling, grammar, and style errors. It integrates seamlessly with the WordPress block editor, helping you create error-free and polished articles.
4. Keyword Management
To enumerate, Keywords and Links Management is an innovative and multifaceted content optimization approach. It helps in discovering, analyzing, grouping, and organizing large numbers of keywords. The main objective is prioritizing, collaborating, and acting on keyword data to build and optimize the PPC (Pay-Per-Click) adverts or SEO search marketing campaign. You can use a tool such as Google Keyword Planner, which helps you discover relevant keywords to improve ranking and reach more readers.
5. Reverse Image Search
Google Image Search is probably the most accessible and popular image search tool — and is the primary go-to resource for many marketers. It helps you find the exact image, check the copyright, and also the size of the picture. But TinEye is also an effective reverse image search engine. It helps identify the initial source or copyright information of images you may want to use in your articles. Notwithstanding, respecting copyright and image licensing is crucial for ethical content creation.
It’s important to emphasize that some resource application platforms, plugins, and tools mentioned above can significantly enhance your article creation process in WordPress. One thing is sure: They help optimize content, create visually appealing graphics, and maintain high-quality writing. They also ensure ethical media use, making blogs more impactful and compelling to the readers.
In Conclusion;
Adding new Articles In WordPress is a dynamic and empowering process that can elevate your online presence and engage your audience. By understanding the critical components of the WordPress dashboard, utilizing the block editor’s rich features, and optimizing your content for search engines, you can create informative, visually appealing articles that captivate your readers.
Additionally, effectively categorizing and tagging your articles, managing drafts and revisions, and using the preview and publication features ensure your content is well-organized and polished. As you embark on your journey of article creation, remember that WordPress provides a user-friendly environment where your creativity can flourish. Your articles help contribute to the narrative.
Resource Reference: How To Add WordPress-Related Posts In 2 Simple Ways + Best Plugins
They help cheer up your website and play a pivotal role in defining your digital identity. With the power of SEO and a structured content strategy, your articles can reach a wider audience, enhancing your site’s visibility. Let your ideas flow, and start adding new articles with confidence. Whether a seasoned content creator or a novice, your voice and insights can find a home online.
In that case, they are waiting to make an impact on the target users and potential audience. Your WordPress journey begins now – seize the opportunity to share your knowledge, inspire your readers, and leave your digital mark. That’s it! We wish you a happy writing! But if you need more help, you can Consult Us anytime and let our professional Web Tech Experts team sort you out.






Kudos! I enjoy this.
who can do my essay help with essay writing afl writing service amibroker
Whoa loads of excellent material!
Whoa a good deal of useful data! Keep up the good work. I will bookmark your website RSS feed and be back for more updates from you…
It is the best time to make some plans for the future and it’s time to be happy. I’ve read this post and if I could I wish to suggest you some interesting things or suggestions. Maybe you can write next articles referring to this article. I wish to read more things about it!
You actually expressed it fantastically!
Comments are closed.