In this article, allow me to show you how to install the WordPress Facebook Comments Plugin. But, wait a minute, what have you done?! You disabled all comments on your soon to be born beautiful blog!
Never fear, for one thing, your knight in shining armor is here and that knight’s name is Facebook! Well, you may or may not like the Facebook Comments Plugin, but the site commenting plugin is pretty awesome.
And for sure, it stops spam in its tracks by requiring real users to log in before leaving a comment – so long trolls. However, the downside is that all your site users who would like to comment need to have a Facebook account.
Related Topic: WP AutoTerms | A Plugin that Helps you be Law Compliant
But, on the plus side, Facebook has over 1.2 billion users. So, there’s a pretty good chance anyone visiting your site will already be on Facebook.
And from my experience, by using the WordPress Facebook Comments Plugin, yes, the number of comments will be lower on your site but the quality will be much higher. Of course, Yes, just like I do, you too would prefer quality over quantity.
Unless I go to the Pizza Hut buffet, but when it comes to comments being left on the jmexclusives website, I’d rather have quality comments. Now, let’s go as long as you’re a friend of Facebook!
What is the Facebook Comments Plugin?
Basically, the WordPress Facebook Comments Plugin lets people comment on the website content using their Facebook profile accounts. Whereby, people can choose to share their comment activity with their friends (and friends of their friends) on Facebook as well.
Also, you can moderate the comments by using Facebook tools. Not to mention, the comments plugin is one of the cleanest and most exciting ways to manage comments on your blog today. Read on if you’d like to know how to add Facebook comments to your WordPress blog site.
I’ll also show you a cool extra trick that will keep your webpage load time high. Making the comments section of your blog even more engaging.
Why use WP Facebook Comments Plugin?
Simply, because Facebook Comments are the cleanest and most exciting way to manage comments on your blog today. And then again, there is no need for a paid plugin to filter WordPress comment spam (like Akismet).
Readers that are logged into Facebook can comment immediately without the need to log in or enter an email. You can also moderate comments on your blog easily using your Facebook account. The Facebook algorithm ranks the best comments to show at the top.
And one thing for sure, most of your blog readers are already on Facebook anyway. Therefore, if you’d like to keep things simple and easy, then read and learn more about how to use a WordPress plugin for Facebook comments below.
Furthermore, they just released a pro version of WP Social Comments having many exciting new features.
How do I add Facebook Comments without a Plugin?
In the first place, this will involve editing files in your WordPress theme folder. But, if you’re considering this I’d highly recommend creating your own child theme to play with.
Moreover, when you have a child theme created head into the folder wp-content/themes/your-child-theme-name and edit single.php.
In that case, search for the part in the file that loads comments on your blog. In the default WordPress Twenty Twenty theme it’s this line you’ll need to replace:
comments_template();
Replace the code that loads comments with this new code:
<?php echo '<div class="fb-comments" data-href="' . get_permalink() . '" data-numposts="5" data-width="100%"></div>' ?>
 <div id="fb-root"></div>
 <script>
 function showComments() { // Custom function called on click
 (function(d, s, id) {
 var js, fjs = d.getElementsByTagName(s)[0];
 if (d.getElementById(id)) return;
 js = d.createElement(s);
 js.id = id;
 js.src = "//connect.facebook.net/en_US/sdk.js#xfbml=1&version=v2.8&appId=[YOUR-FACEBOOK-APP-ID]";
 fjs.parentNode.insertBefore(js, fjs);
 }(document, 'script', 'facebook-jssdk'));
 }
</script>
Replace [YOUR-FACEBOOK-APP-ID] the app ID of the Facebook app you’ll create in the next step.
The next step is to head over to Facebook Developers and create a simple app to manage the comments on your site. Use all the default settings and copy the app ID into the code on your WordPress site replacing [YOUR-FACEBOOK-APP-ID].
You should now have Facebook comments working on your WordPress blog without the need for a plugin!
How do I Use the WP Facebook Comments Plugin?
First of all, click that big button to download the Facebook Comments WordPress plugin. Here is the Facebook Comments plugin zip file.
Secondly, Upload the Facebook Comments WordPress Plugin. By logging into your WordPress Admin Dashboard (yourdomain.com/wp-login.php).
Then again, go to the Add New Plugins Page.
And finally, hover over Plugins in the left sidebar and click Add New.
Adding the new Plugin;
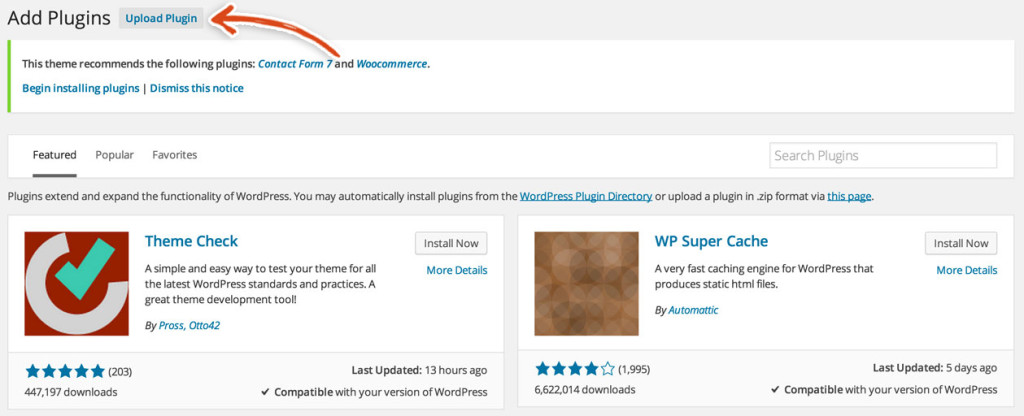
Click on the Upload Plugin button at the top of the Add Plugins page.
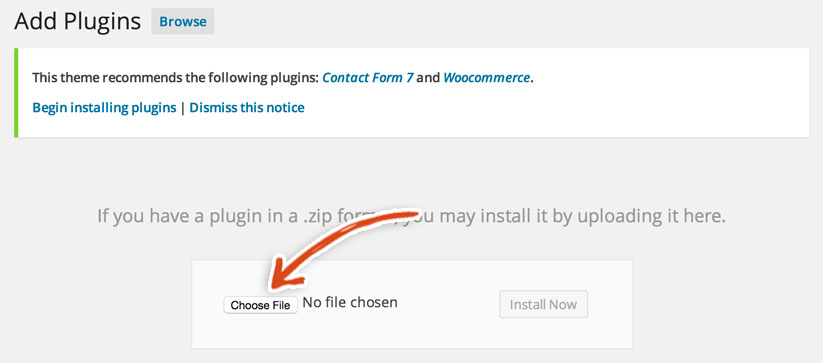
Click the choose file button and choose the Facebook Comments zip file.
Activate the Facebook Comments WordPress Plugin.
Click the Activate link once the plugin has been successfully installed.
You should now see Facebook Comments on the plugin list page.
The Facebook Comments plugin is installed! Half the battle is complete!
Now, we need to go head over to Facebook to complete the integration with your website.
Time to Become a Facebook Developer
Your next step is to go to developers.facebook.com/apps.
If you’re logged into your Facebook account already, it should show the page below. Otherwise, login using your Facebook credentials or create a Facebook account.
Click on the green Register Now button on the right side of the page (it should be next to “Become a Facebook Developer”).
How do I Become a Facebook Developer?
Eventually, if you are already a Facebook developer, click on the green button entitled Add a New App.
This should bring up the modal below. Accept the Facebook Platform and Privacy Policies and click the blue Register button.
This will bring up the modal below that says that you have successfully registered as a Facebook Developer.
Adding a Facebook APP ID;
Once you click the blue Done button it will display the screen below.
Click on the Website circle icon on the right of the screen.
The next step is to click the Skip and Create App ID button in the top right corner.

This will bring up the following modal.
Enter in the name of your app, you can call it whatever you want (typically we just use our domain name without the .com).
Then, choose a category, and then click the blue Create a Facebook App ID button.

Hoorah you’ve created your first Facebook App (or bajillionth – if you’ve done this before)!
You should now be on the main page for your brand spanking new Facebook App – which is where you can find your App ID.
As you can see from the below screenshot, the given App ID is 235235353.
Click on the Settings link in the left sidebar.
Make sure that the Facebook App Domains, the Site URL and the Mobile Site URL, fields are all set to the domain that you are using for your site.
Enter the correct values into those fields and click the Save Changes button.
Next, head back over, or login, to your WordPress dashboard (yourdomain.com/wp-login.php).
Once you’re on your dashboard, hover over the Settings tab in the left sidebar and click on Facebook Comments.
This should bring up the page below. Paste the Facebook App ID into the field and press the blue Save Changes button at the bottom of the page.
Facebook Comment Moderation Settings;
The page should refresh with a message saying “Settings Saved.” Then, you should see a couple of new form fields.
As you scroll down the page, you will be able to change Moderation settings. As well as a number of Main Settings and Display Settings (as seen in the screenshot below).
The Facebook Moderation Settings gives you the ability to add other people as moderators for the Facebook Comments Plugin. And since you added your App ID, you are automatically a moderator. If you wanted to add additional moderators, you would just enter the Facebook ID for each moderator in a comma-separated list.
Above all, we’re going to leave this blank because we’re going to be the only moderator for the time being.
Default Main and Display settings;
We’re going to leave the default Main and Display settings in place because we want:
- Facebook Comments to only be present on Singular Post pages
- English set as the default language
- the Light color scheme
- 5 comments to show
- the width to be responsive at 100%
- the title to be Comments
- the comment count to be hidden with no comment text (so make sure to uncheck the Show Comment Count and leave the Comment Text field blank)
However, please feel free to play with these cosmetic settings to your heart’s desire!
Whew!! All done, you’re ready Freddy!
Takeaway,
As a matter of fact, your Facebook page fans can be one of your organization’s richest sources of interaction, R&D and lead marketing generation. But, the only problem is making people aware of it! And eventually, how you make them aware is by a good Facebook promotion campaign.
However, many people find the Facebook Ad manager too complex, clunky, and confusing to use. That’s where jmexclusives comes into play.
As an example, AdEspresso is my referral web-based tool that allows you to create complex campaigns and split testing without all of the extra fluff. And also many other related inconveniences of using Facebook Ad Manager.
So, start driving results across Facebook, Instagram, and Google with Facebook Page Creation | With Step-by-step Promo Guides.
Resources;
By all means, I hope the above-revised guide on how to get started with Facebook Comments WP Plugin is useful. However, if you’ll require more guidance pertaining to this or more of our blog topics, please Contact Us.
And be that as it may, are you using a Facebook or WordPress comments or another commenting platform? What works best for you? Please, leave your thoughts and let me know in the comments box below this blog page.
You may also like;
- Disable WP Comments
- WP Social Post and Widget
- WooSocio
- WP Twitter Post (WooTweet)
- WP Social Comments Pro version


