When you sign in to Chrome, Syncing Google Account Settings can help save your bookmarks, history, passwords, and other settings in your Google Account. This saved data can be used on any device. You can choose what info is saved in your Google Account. Syncing Google Account Settings is vital since you can get your bookmarks, passwords, and more on all your devices.
For instance, if you change devices, like if you lose your phone or get a new laptop, you can get your saved info back. You can sign in automatically to Gmail, YouTube, Search, and other Google services. Furthermore, you can transfer and synchronize Gmail, Calendar, and Contacts data automatically by logging in to the Google account used to synchronize data on your old device.
Syncing Google Account Settings works with ChromeOS version 18 and later and is on by default when you sign in to your Chromebook. To keep your information secure, synced data is encrypted when it travels between your computer and Google’s servers. As an added layer of protection (safety check), your saved passwords are encrypted on Google’s servers using a cryptographic key.
On the one hand, you can choose to encrypt your synced data. This doesn’t include payment methods and addresses from Google Pay. Be that as it may, you can learn how to encrypt data in simple steps. On the other hand, you can remove your synced data from your account at any time. Now, let’s learn how the Syncing Google Account Settings process across Android Accounts often works.
Syncing Google Account Settings Across Accounts In Android
Synchronization is a process that ensures any changes to a file on the desktop or in the cloud service are reconciled so that each copy of the file reflects your latest changes. When you set up synchronization between a cloud service and a desktop device, behind the scenes, the OneDrive app runs on your desktop and automatically keeps your files in sync.
Most importantly, you can access and manage the files on your desktop, even when you are offline. Synchronization of your files helps you work with greater efficiency. Android users often have multiple accounts on their devices, which can make it challenging to keep all data and settings in sync across accounts. For instance, a user may have a work account and a personal account.
Each has a different set of contacts, emails, and preferences. In such cases, it can be frustrating to switch between accounts constantly to access specific data and settings. Fortunately, Android offers various methods to sync data and settings between accounts, making it easier for users to manage multiple accounts efficiently. In the next section, we’ll explore these methods in detail.
1. Google Sync
Given the ever-evolving cloud computing technology landscape, it’s worth noting that Chrome regularly updates with tools and features that make it faster and easier to use. With the help of Chrome Tools, you can browse safely and stay in control. A feature such as Incognito Mode (Dark Mode) helps manage your web browsing history and keep your Internet search process private.
Be that as it may, the most obvious and widely used method for syncing data and settings across accounts in Android is through Google Sync. This feature allows users to sync their Google services, such as contacts, calendars, and emails, across all accounts on their Android devices. It works in the background, ensuring that the data is constantly updated and readily available.
Google Sync allows you to bring bookmarks, saved passwords, and other browser settings to any computer that you work on. It also can prevent you from losing settings if your hard drive fails or if you receive a new computer. Our elaborate guide assumes you have a Google account. If you do have an account, jump to the next part for instructions to complete a one-time bookmark backup.
2. Backup & Restore
Another useful method for syncing data and settings across accounts is through Backup and Restore. This feature allows users to back up their entire device, including app data, settings, and preferences, to their Google account. They can then restore this backup to any other Android device with the same Google account, making it easy to sync data and settings across multiple devices.
To back up your device, go to Settings > Backup and Restore and turn on the toggle button for Backup my data. This will initiate a backup of your device’s data to your Google account. To restore this data on another device, sign in to the same Google account and go to Settings > Backup and Restore and select the backup you want to restore.
3. Third-Party Applications
There are also third-party apps available on the Google Play Store that can help users sync data and settings across accounts in Android. These apps offer a more comprehensive syncing solution, allowing users to choose which data and settings they want to sync across accounts. Some popular options include Sync for iCloud and Sync for Yahoo.
These apps work similarly to Google Sync, where users can select the accounts they want to sync and toggle on the services they want to sync. However, they offer a more customized and flexible approach, allowing users to sync specific types of data and settings rather than syncing everything at once.
4. Android Work Profiles
For users who have a work account and a personal account on their Android device, Android offers a feature called Work Profiles that can help keep data and settings separate. Work Profiles allow users to have two separate profiles on their device, one for work and one for personal use. This way, all work-related data and settings are contained within the work profile, and they are not mixed with personal data.
To set up a Work Profile, go to Settings > Accounts > Work Profiles and follow the instructions to set up your work account. Once set up, users can switch between their personal and work profiles easily, ensuring that data and settings are kept separate.
How Syncing Google Account Settings Can Streamline Computing Tasks
Syncing, short for synchronization, refers to the process of ensuring that the data on two or more devices is consistent and up to date. In other words, synchronization involves ensuring that the same files and information are available on all devices that are being synced. If you turn off the Syncing Google Account Settings process, you can still see your bookmarks, history, passwords, etc.
You’ll also still see other settings on your computer. If you make any changes, they won’t be saved to your Google Account and synced to your other devices. When you turn off sync, you’ll also be signed out of other Google services, like Gmail. A wise user would rather leave it on, otherwise, it could affect things like notifications and data backups. What if you’re on a recent Android version?
If you are operating on a recent Android version, you’ll have something known as Doze mode. Eventually, when the screen is off, Android automatically defers sync jobs so it doesn’t occur constantly and waste battery. You can back up your data to the Google server and synchronize it with a Google account. There are many reasons why syncing Google account settings is vital.
Consider the following:
- Your settings and data are synced to your Google Account. This way, your saved settings will be ready when you sign in to the same account on a different Chromebook.
- If your Chromebook is stolen or broken, you can get back your history, settings, data, bookmarks, apps, extensions, and themes just by signing in again. (Note: Downloads are not synced.)
- Changes to Chrome will sync right away. If you’ve signed in to the same Google Account on a different Chromebook and have sync turned on, any changes you make on your Chromebook will show on Google Chrome on other devices where you’re signed in. Learn how to sign in to Chrome.
Remember, depending on the type of content, there are several ways to back up and synchronize. For example, if you want to transfer data from your old device to a new device, set the backup on your old device and synchronize it with your Google account on the new device. Backing up is especially recommended if you are updating your device software to a newer Android version.
In other words, by syncing Google account settings, you can easily and quickly explore the Chrome Web Browser data in your account.
- History: Sites you visited in Chrome, including web addresses you entered in the address bar. You can also manage your history in Chrome through the simple steps provided.
- Bookmarks: Pages you bookmarked in Chrome.
- Reading List: Pages you added to your reading list in Chrome.
- Open Tabs: Tabs that are currently open in Chrome on one of your devices.
- Addresses: Information you entered into online forms, like phone numbers, email addresses, and some addresses.
- Passwords: Passwords and passkeys you saved in your Google Account and a list of sites where you requested Chrome to never save passwords. To manage them, go to Google Password Manager.
In addition, you can also manage the overall settings in Chrome, monitor the applications that you use in Chrome from the Chrome Web Store, Play Store, and more, extensions from the Chrome Web Store, your theme from your settings or the Chrome Web Store, and much more. Hitting the button below the data page deletes your Chrome data that has been saved in your Google Account.
This might also delete some data from your other computing devices (mobile and tablet). Now, the next step is to choose what information to sync.
To enable Google Sync;
- First, open Chrome (www.google.com) and click on Sign In.
- Then, go to Settings > Accounts
- Secondly, select the account you want to sync
- After that, select the Google account
- Lastly, toggle on the services you want to sync.
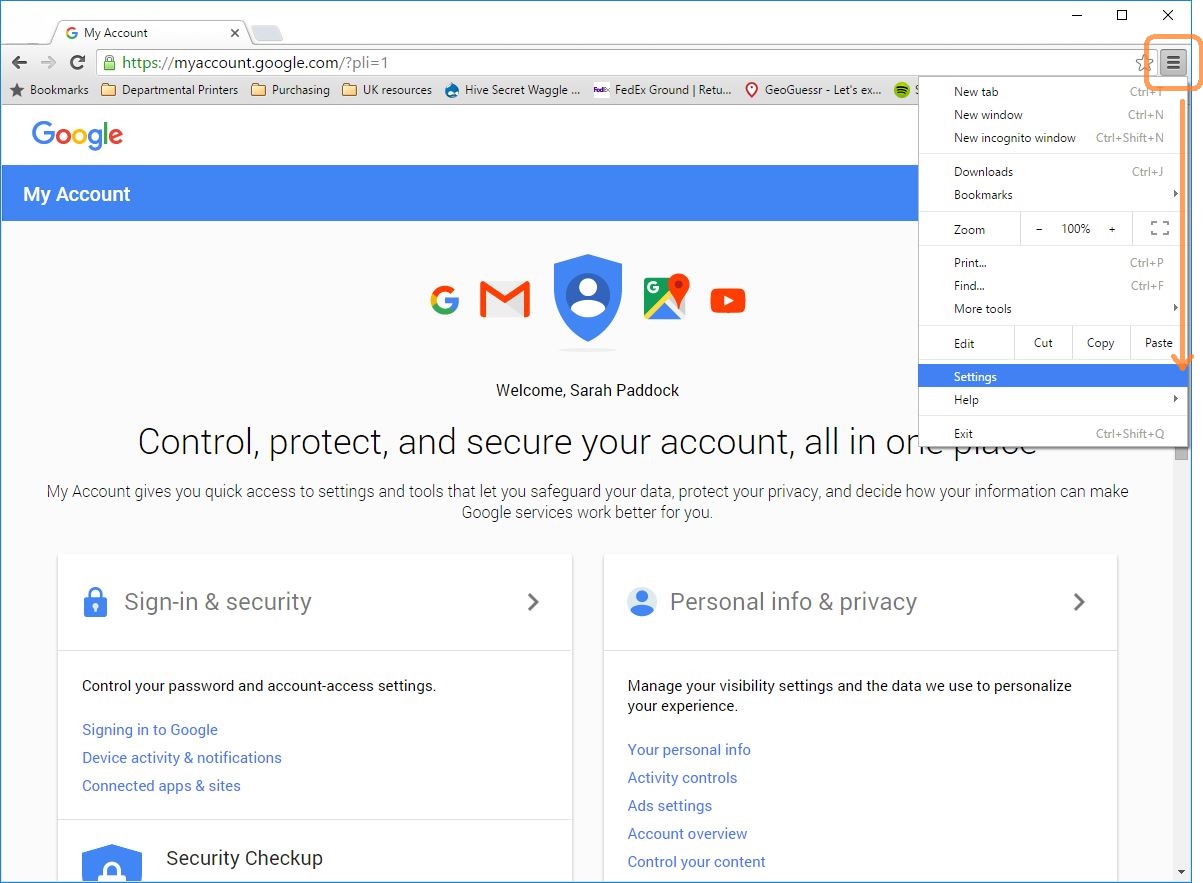
For example, if you want to sync contacts and calendars, turn on the corresponding toggle buttons. This way, your contacts and calendars from the selected Google account will be available on all other accounts on your device. Next, type in your Gmail address and click Next. On the next screen, enter your password to log into your account. Click on the Menu button and choose Settings.
As shown below, click on Sync Options and then review your settings as you make any custom changes. Now you are done! Try logging into Chrome on another computer to confirm that your bookmarks are synced correctly.
By completing the steps above, it means you can now save and sync things like your history, bookmarks, passwords, and Wi-Fi networks to your Google Account. That way, you’ll always have them on any Chromebook and in Google Chrome on other devices where you’re signed in.
The Best Management Plan While Syncing Google Account Settings
As mentioned, Google Chrome allows you to back up and sync your browser history, saved passwords, and settings to have a consistent experience across multiple devices. If you are migrating to a new computer, the IT Department suggests syncing your profile before switching to the new device to decrease downtime or loss of data.
To save your info to your Google Account, turn on sync. In this case, you can always choose what information to allow while Syncing Google Account Settings and working on an effective management plan.
The simple steps for desktop users:
- On your computer, open the Chrome web browser
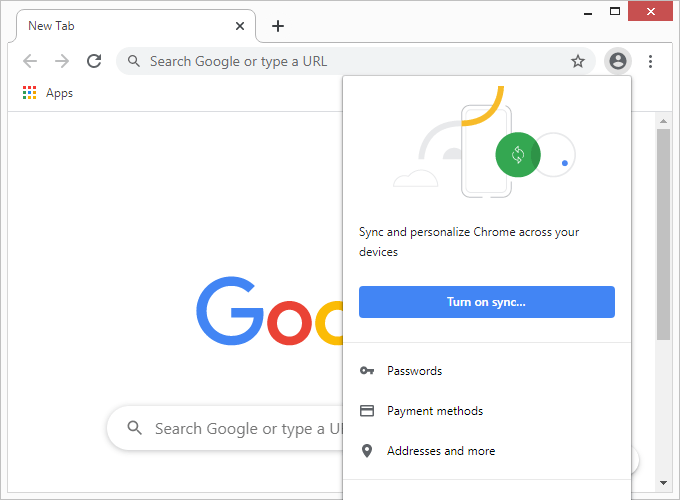
- At the top right, click Profile
- Click Turn on sync
- Sign in to your Google Account
- From the resulting window, click Link Data (not Create New Profile)
- You will be asked to turn on sync. Click Yes, I’m In to opt in.
The simple steps for Android users:
- At the bottom right, select the time.
- Select Settings .
- Under “Accounts,” select Sync and Google services.
- Select Manage what you sync.
- Choose what you’d like to sync.
- To use all the same settings on every Chromebook you sign in to, turn on Sync everything. You’ll have to turn this on for every device you’d like to sync.
- To choose specific settings to sync in each Chromebook you sign in to, turn on Customize sync. Then, under “Sync data,” turn on your preferred settings to sync.
- Optional: Under “Encryption options,” you can encrypt your synced data with a passphrase. This doesn’t include payment methods and addresses from Google Pay.
With that in mind, you can also learn how to create a sync passphrase in simple steps. It’s also essential to note that if you’re using a Chromebook at work or school, your administrator might choose to turn off sync. If so, you won’t be able to sync your information.
The steps to sync info in Chrome
- On your computer, open Chrome.
- Select More Settings.
- Under “You and Google,” select Sync and Google services.
- Under “Sync,” select Manage what you sync, Sync everything, or Customize sync.
- If you select Customize Sync, under “Sync data,” you can choose what to sync across all Chrome browsers that you’re logged into.
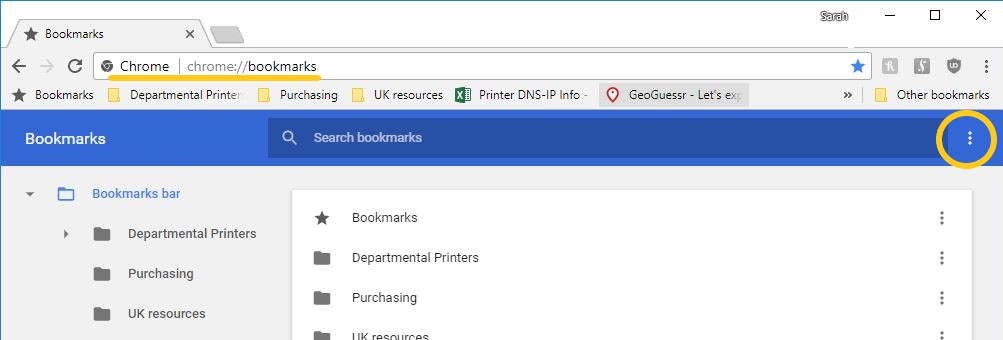
Remember, you can also do a manual backup. In your Chrome browser, go to chrome://bookmarks and click on the three dots for Options. Once there, click on the Export Bookmarks Option as shown below.
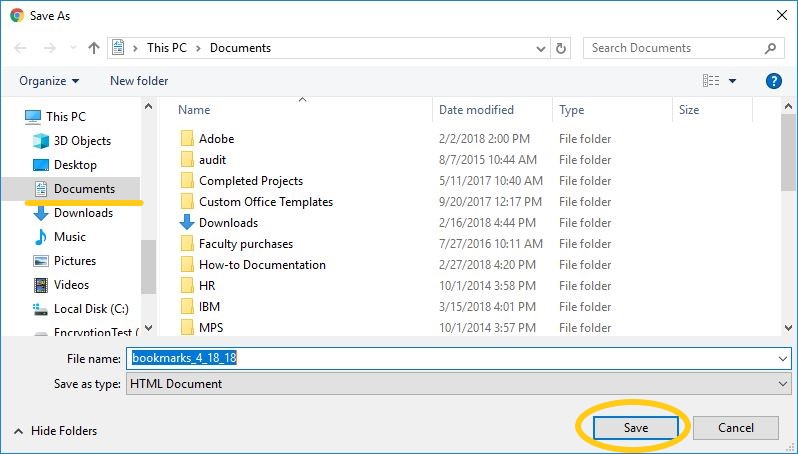
The next step is to choose a file server location to save your bookmarks file (your A&S Desktop or Documents folder will work well). Then, click on the Save Button to effect the changes.
Opting Out From The Syncing Google Account Settings Process
There’s one reason some users may want to opt out from the Syncing Google Account Settings process. Google Sync doesn’t support OAuth authentication, 2-factor authentication, or security keys, which leaves your organization’s data less secure. With more secure alternatives available, we recommend that you transition off Google Sync. Thus, the reason to turn off the sync process.
As mentioned, if you turn off sync, you can still see your bookmarks, history, passwords, and other settings on your computer. If you make any changes, they won’t be saved to your Google Account and synced to your other devices. When you turn off sync, you’ll also be signed out of other Google services, like Gmail.
The steps to turn off sync:
- On your computer, open the Chrome web browser
- At the top right, click Profile -> Sync is on
- Click Turn off
Learn how to delete your synced info from your Google Account. To sign out and turn off your Chromebook, you can explore the guide on how to sign out and turn it off for more information. When you sign in to your Google Account through a Google service, like Gmail, you’ll be automatically signed in to Chrome. You can turn off Chrome sign-in to never sign in to Chrome.
Equally important, you can also delete your synced information from your Google Account at any time.
Follow these steps:
- At the bottom right, select the time.
- Select Settings
.
- In the “Accounts” section, select Sync and Google services.
- Select Review your synced data.
- At the bottom, select Reset sync.
All the information that has been synced will be deleted from your Google Account. All of your bookmarks, apps, and extensions will stay on your Chromebook but won’t show up on other Chromebooks you use.
The Process For Synchronizing With Microsoft Exchange ActiveSync
For your information, if your company uses a Microsoft Exchange ActiveSync account, you can access your corporate email messages, calendar appointments, and contacts directly on your device. After setup, you can find your information in the Email, Calendar, and Contacts applications. The process allows you to set up a Microsoft Exchange ActiveSync (EAS) account on your device.
Unfortunately, by doing so, the EAS security settings may limit the lock screen type to only a PIN or password. This occurs when your network administrator specifies a lock screen type for all EAS accounts for enterprise security reasons. Contact the network administrator of your company or organization to check what network security policies are implemented for mobile devices.
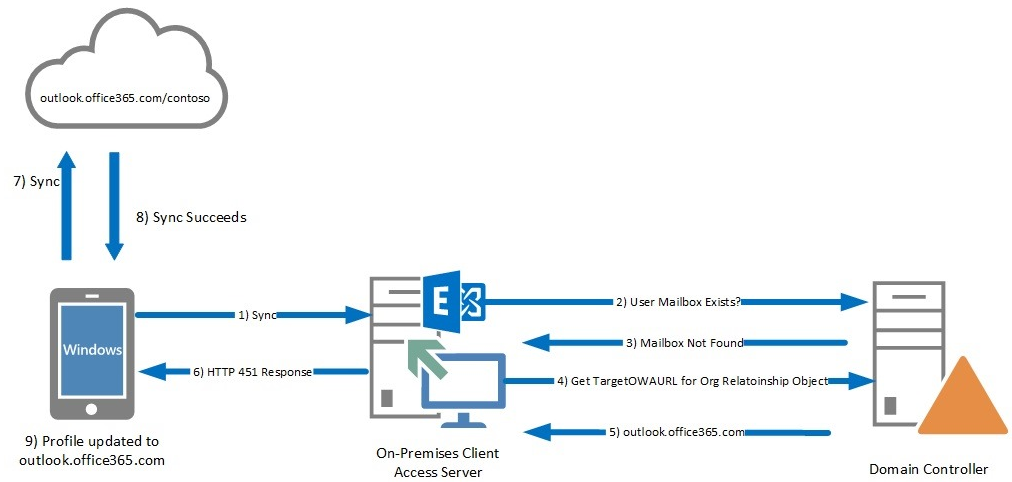
To enumerate, Exchange Server 2013 Cumulative Update 8 (CU8) and Exchange Server 2010 SP3 Rollup Update 9 (RU9) introduced a new feature to provide a more seamless experience for ActiveSync-enabled users who move from on-premises Exchange servers to Office 365. Recently, the user’s mailbox was moved from Exchange on-premises to Exchange Online (Office 365).
Fortunately, to help streamline the process, Outlook and Outlook Web App (OWA) have a seamless method to redirect the user to the new mailbox location. Outlook uses Autodiscover to redirect the user, and OWA provides a link to the Office 365 login. In short, this is the pre-update mail synchronization flow for an EAS device after a mailbox is moved from on-premises to Office 365.
To set up an EAS sync account:
- Tap Settings > Accounts > Add account > Exchange ActiveSync.
- Enter your corporate email address and password.
- Tap Next. If a failure occurs, enter the domain and server details for your account manually and then tap Next.
- Follow the on-screen instructions to complete the setup.
- Tap Show more sync options to select a synchronization method, a synchronization interval, and the data that you want to synchronize with your device.
- Tap Next, then select how you want to be notified when a new email arrives.
- Tap Next, enter a name for the corporate account, then tap Finish setup.
- If prompted, activate the device administrator to allow your corporate server to set certain security rules on your device, such as disabling voice recording and using storage encryption.
To remove an EAS sync account:
- Find and tap Settings > Accounts.
- Select the EAS account that you want to remove.
- Tap Remove account.
- Tap Remove account again to confirm.
We recommended that you back up your data to a computer when you have large volumes of media files, such as photos, videos, and music files. You can also transfer your data from an old device to your new device by connecting both devices to the computer at the same time. Use a USB cable connection between a Windows computer and your device to transfer and manage your files.
Related Resource References:
In conclusion, Android offers various methods for syncing data and settings across accounts, making it convenient for users to manage multiple accounts on their devices. Whether through Google Sync, Backup and Restore, third-party apps, or Work Profiles, users can choose the method that works best for them and ensure that their data and settings are always up to date and accessible.
This way, users can save time and effort and focus on using their devices efficiently for both personal and professional purposes. Overall, Synchronization is an essential process that ensures any changes to a file on the desktop or in the cloud service are reconciled so that each copy of the file reflects your latest changes.

