There is a feature called WordPress Post Revisions or simply Revisions. A built-in feature that allows you to undo changes and go back to a previous version of a post. Bearing in mind, most of us make mistakes when writing. Sometimes you might wish that you hadn’t deleted what you wrote earlier.
Revisions allow you to fix that by going back in time and undoing the changes. This feature is also connected with another feature named ‘autosave’. WordPress by default saves a copy of the site content every 60 secs when one makes changes.
In other words, every sixty seconds, this saved copy is overwritten repeatedly. And as a result, only one autosave exists for every user. This prevents the content from getting deleted in the unlikely events mentioned earlier. Besides, one can also use the revision interface to access ‘autosave’.
What Is WordPress Post Revisions?
WordPress Post Revisions is a feature that allows you to undo changes and go back to an earlier version of your posts and pages. For each draft you are working on, WordPress automatically saves a temporary revision.
This type of revision is called auto-save. WordPress stores an auto-save every 60 seconds. It also automatically replaces the older version with the new auto-save. The autosave feature helps you restore the content if something goes wrong before you can save it.
Related Topic: How to Earn Links Organically | SEOs Link-building Tactics
For example, if your browser crashed or your computer hanged while writing, then you can restore your latest draft from the autosave. WordPress also saves post revisions each time a user clicks on the save, update, or publish button.
Unlike auto-saves, these revisions are permanently stored in the WordPress database. You can locate, browse, and revert back to any of these revisions from the post edit screen. You can read and learn more about What Is A Post Revision? To gather more.
Why is WordPress Post Revisions important?
As I mentioned, revisions are stored in the database, and if many are stored, can cause bloat. This bloat may lead to slower queries, which can have a noticeable performance impact. The value of these revisions also depends on what is being tracked.
For example, I may want to store every revision of the posts I write, but only desire to keep the latest five versions of each page on my site. Starting in WordPress 3.6, this control is available. But, WordPress doesn’t provide a native interface to specify revisions quantities.
That’s why I wrote this quick guide to do so. Almost every CMS Software user can benefit from WordPress post revisions. Writing great content requires a lot of tweaking and edits. Post revisions allow you to see your process and take a bird’ eye view of how your post has evolved.
Related Topic: How a Content Management System works | & Its Benefits
You can then switch between different states of your draft, make changes, and make your article perfect for publishing. For multi-author WordPress sites, post revisions allow editors to easily manage the work of multiple authors.
You can see who made changes to an article, what changes they made, and so on. That being said, let’s take a look at how to use post revisions to improve your WordPress posts and pages. In short, WordPress Post Revisions are a very useful feature that saves content on the WordPress site regularly.
So that in an unlikely event such as when the browser gets crashed or occurrence of power outrages, one can restore the previous version of their posts. Besides, often while writing an article or blog, writers might make some changes which they regret later.
How to Undo Changes in Website Posts Content
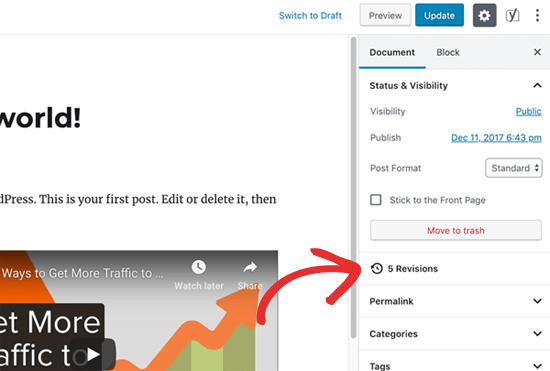
Basically, the WordPress CMS Platform displays the number of revisions under the ‘Document’ panel on the post/page edit screen. You can find that on the right-hand side of your post editor screen. In that case, you can always go back to the previous drafts and undo the changes.
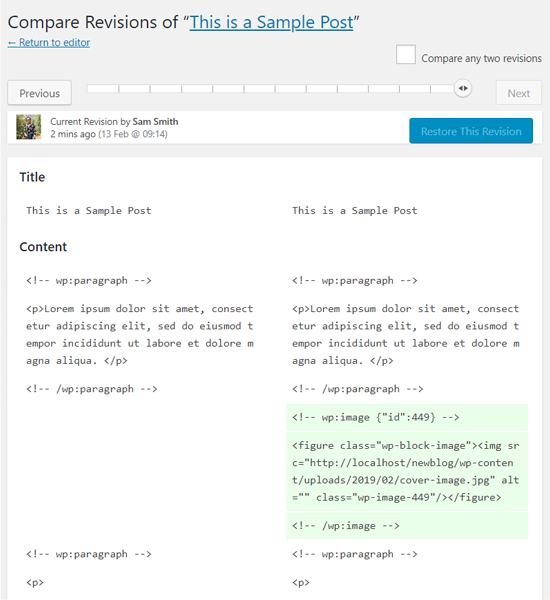
As a webmaster, by clicking on the ‘Revisions’ button, your WordPress CMS Software will take you directly to the post revisions screen. Whereby, the post revision screen will show you the latest revision of the post with a scrollbar on top.
Sliding the button on the scroll bar will take you to earlier revisions of the post.
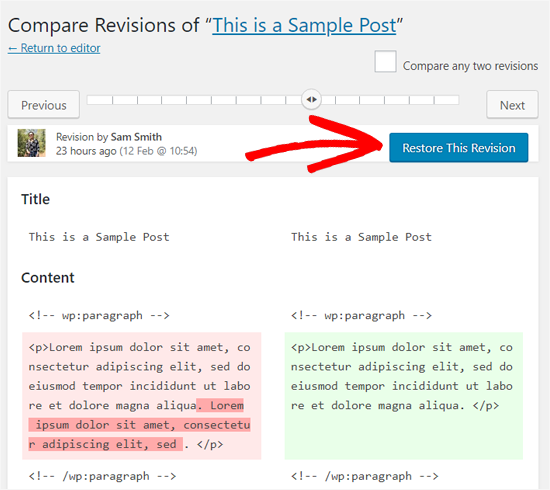
Changes made in each revision will be highlighted in green and pink colors. On the top, you can see the user who made these changes, time, and other information.
In addition, WordPress will also let you know if a revision is an autosave or a draft.
How to move around revisions
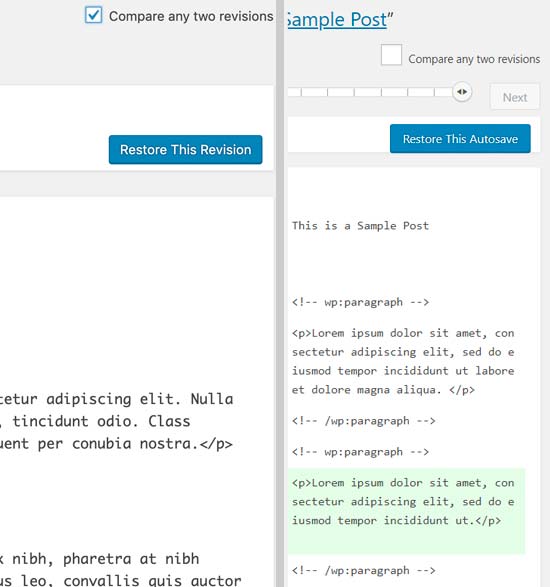
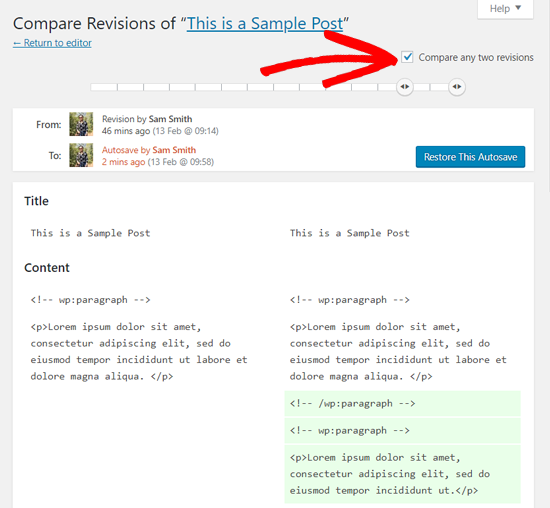
Well, you can use the next and previous buttons to move around revisions. Plus, you can check the box on top that says ‘Compare any two revisions. Doing so will split the scrollbar button into two.
And as such, you can take each button to a different revision and compare the difference between two distant revisions.
How to Restore your Revisions
Notably, to restore a revision, you can simply click on the ‘Restore This Revision‘ or ‘Restore This Autosave‘ button.
In that case, WordPress will restore the selected revision as your current post revision, and you can then save it as a draft. But, always keep in my mind, that restoring to an earlier revision will not delete the latest version of your post.
Instead, WordPress will store it in the database as another revision.
How to Use WordPress Post Revisions with Classic Editor
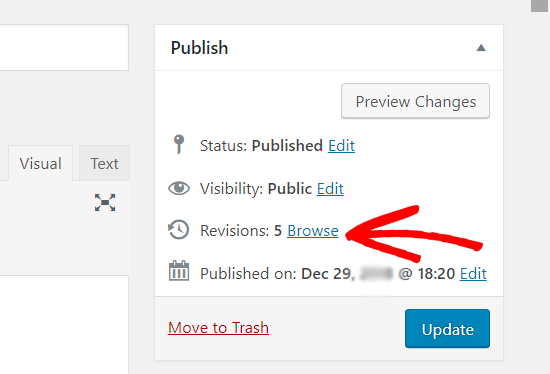
In case, if you haven’t upgraded your WordPress to Gutenberg and still using the Classic Editor, then you’ll find the post revisions in the publish meta box. Especially, that’s located on the right panel of the post/page edit screen.
Therefore, to view the post revisions, you can simply click the ‘Browse Link’ next to the number of revisions. Apart from this, the post revisions work similarly in both the Classic Editor and Gutenberg (aka the Block Editor).
All post revisions are stored in your WordPress database. Due to this, many users worry that too many revisions can slow down their websites.
So, is it true? Well, it’s not true. Now that you can always easily limit your WordPress Post Revisions right in your Admin Dashboard.
How do you Limit WordPress Post Revisions?
There is only ever a maximum of one autosave per user for any given post. Perse, all new autosaves overwrite old autosaves. This means that no, your tables do not grow by one row every 60 seconds. In multi-user settings, one autosave is stored for each user.
On the other hand, all autosaves are enabled for all posts and pages but do not overwrite published content. Autosaves are stored as a special type of revision — they do not overwrite the actual post.
In fact, whether your power goes out, your browser crashes, or you lose your internet connection, when you go back to edit that post, WP will toss up a warning. Particularly, telling you that it has a backup of your post and a link to restore the backup.
Related Topic: How is Content Marketing done? A Free Ultimate Guide
When reviewing revisions, autosaves are clearly marked. However, WordPress skips post revisions when making database calls on the front end. It only looks for revisions on the post edit screen. Or even when you are actually browsing revisions.
Fortunately, you can still control and limit post revisions in WordPress. Thus, I’ll show you a few different methods to do just that. And then, thereafter, you can choose the one that best suits you.
1. How to Limit Post Revisions with WordPress Plugins
In the first place, one of the easiest ways to manage posts revision is by using a WordPress Plugin.
This allows you to control revisions from the Admin area. So, the first thing you’ll need to do is install and activate the WP Revisions Control Plugin. For more details, see a step-by-step guide on how to install a WordPress plugin.
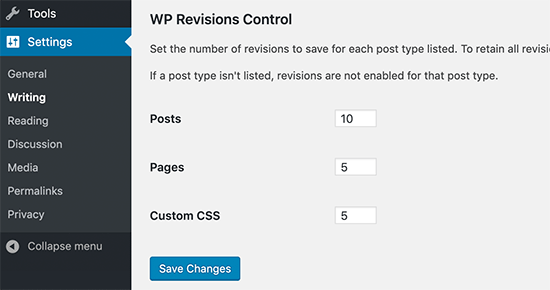
Upon activation, you’ll then need to visit the Settings » Writing page and scroll down to the WP Revisions Control Section. Here are the plugin installation files to download and upload directly.
More specifically, WordPress 3.6 allows users to control how many revisions are stored for each supported post type. No longer must you rely on the WP_POST_REVISIONS constant, which applied universally.
In other words, the WP Revisions Control Plugin — By Erick Hitter, provides an interface for this new functionality. And with this plugin enabled, you’ll simply visit its Settings > and then its Writing tools. In order to specify the number of revisions retained for each post type.
Related Topic: How WordPress Caching Is Done | Top 10 Webster Plugins
First of all, all thanks to Maria Ramos at WebHostingHub, the plugin is also available in Spanish. So, from jmexclusives, it’s many thanks to her for her efforts!
And, with that in mind, from here you’ll just need to enter the number of revisions you want to store for each post type. And then click on the ‘Save Changes’ button to store your settings. WP Revisions Control will now limit the post revisions stored in your WordPress database.
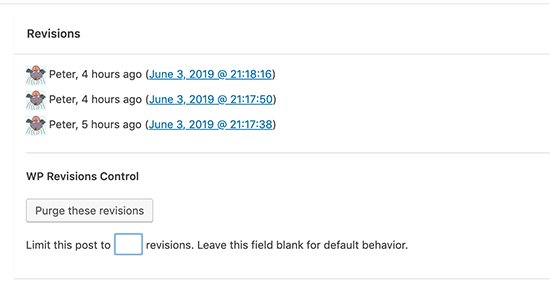
The plugin also allows you to delete revisions for an individual post.
Simply edit the post where you want to delete revisions and scroll down below the editor. Furthermore, you can limit the revisions for this post only or delete them by clicking on the ‘Purge these revisions’ button.
You can also use the Simple Revisions Delete Plugin too. It adds a discreet link within a post submit box to let you purge (delete) its revisions via AJAX. Bulk actions are also available. You can learn more about how to start using it too.
2. How to Manually Disable Old Post Revisions in WordPress
Occasionally, updating or revising a post on your WordPress site isn’t a time-consuming task. It also doesn’t take up a lot of space.
However, over time, revisions do start to add up and can eventually take up a considerable amount of space on your database. Whether you’re in a pursuit to free up some much-needed space or prevent the matter altogether, disabling or removing old post revisions from your WordPress site is an available option.
Doing either can help reduce database bloat and optimize performance. WordPress allows you to control how many revisions you want to keep for an article.
Related Topic: Tags & Categories | WordPress SEO Master Best Practices
To limit post revisions, simply add this code to your WordPress site’s wp-config.php file. But, don’t forget to replace 10 with the number of revisions you want to keep for each post (i.e 5).
1 | define( 'WP_POST_REVISIONS', 10 ); |
Specifically, for pro webmasters, I normally advise you to use the above method to help save your WP database. But, for new beginners, the plugins option is simply the best starting point.
Old post revisions are perfectly harmless, and you don’t need to delete them in most cases. However, if you have a very large website with thousands of articles, then deleting old post revisions can help you reduce backup sizes.
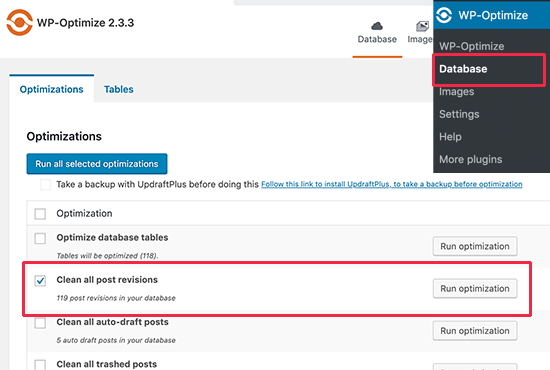
First, you’ll need to install and activate the WP-Optimize Plugin. And then, upon activation, you’ll need to go to WP-Optimize » Database page.
You’ll then check the box next to the ‘Clean all post revisions’ option. And click on the ‘Run optimization’ button to delete all post revisions. Furthermore, you can uninstall the plugin after you have deleted the revisions.
That’s if you’re concerned with your WordPress database buildup like I am. So, once you have cleaned up revisions, feel free to uninstall and delete the plugin.
3. How to Delete WordPress Post Revisions via phpMyAdmin
In reality, all advanced webmasters can delete WordPress Post Revisions via phpMyAdmin. But, first, you’ll need to make sure that you’ve created a complete WordPress database backup.
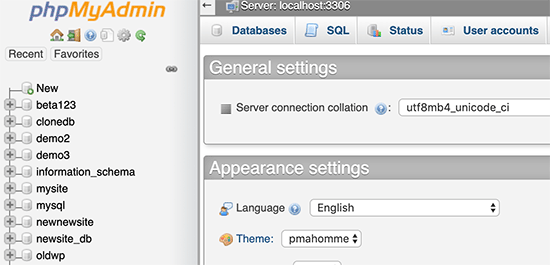
After that, you’ll simply log in to their WordPress hosting control panel and then click on the phpMyAdmin icon. Next, you’ll need to select their WordPress database from the left column. As a result, the phpMyAdmin software will now display tables in your WordPress database.
After that, you’ll need to click on the SQL tab from the top menu. By doing so, it will load phpMyAdmin’s SQL interface. And from here, you can manually run commands on your WordPress database.
You’ll need to enter the following code.
1 | DELETE FROM wp_posts WHERE post_type = "revision"; |
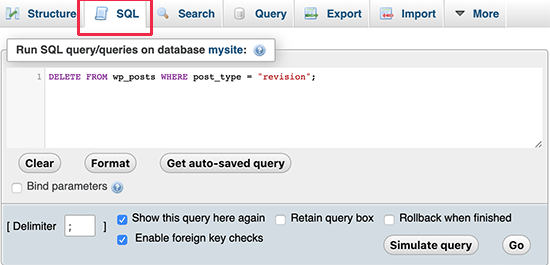
Likewise, don’t forget to replace wp_ with your own WordPress database prefix.
And then after that, click on the ‘Go ‘button to run the command. PhpMyAdmin will now delete all revisions from your WordPress database. But, it’s important to realize, deleting revisions will not stop WordPress from saving revisions for your future posts.
4. How to Completely Disable WordPress Post Revisions
One thing for sure, I don’t recommend disabling WordPress post revisions. However, some users may want to disable revisions to reduce their WordPress database size.
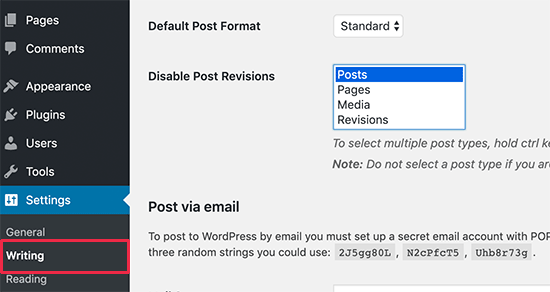
The easiest way to do this is by installing Disable Post Revision Plugin. Upon activation, go to the Settings » Writing page and select the post types where you want to disable the revisions feature.
Don’t forget to click on the save changes button to store your settings.
If you don’t want to use the plugin, then you can also do the same thing manually by adding this code to your wp-config.php file.
1 | define('WP_POST_REVISIONS', false ); |
This code disables the WordPress post revisions feature on your website. It will still allow WordPress to save one autosave and one revision in your browser storage.
Final Thoughts,
As you know, the user experience is the first thing that impacts the growth of your website. As well as the page loading time of your website which’s directly proportional to user engagement.
Oftentimes, WordPress users ignore database optimization. Using a CDN (like Cloudflare), caching plugin, code minifying, and other tricks can’t work if you don’t focus on deleting the extra database tables. And that’s where a tool like WP-Sweep Plugin comes in handy.
Related Topic: WP-Sweep Plugin | A Site Performance & Enhancement Tool
So, to enumerate, if you have been using WordPress for a while, then there is a good chance that you’ll need WP-Sweep Plugin to clean up your WordPress site.
Doing regular clean-ups allows you to reduce your database size which means quicker and smaller backup files. And as you continue to use WordPress, your database accumulates a lot of extra data. Such data includes revisions, spam comments, trashed comments, etc.
Or even data from plugins you are no longer using, and so much more. Removing all this unnecessary data can significantly reduce your database size. The WordPress plugin mentioned above uses proper WordPress delete functions as much as possible.
Related Topic: Which is the Best Time to Post Blogs in Content Marketing?
Instead of running direct delete MySQL queries. While speeding up your backup process and can add minor performance improvements as well. You can read more for your own further understanding.
Finally, I hope that this article helped you learn how to use WordPress post revisions to undo your changes. As well as how to manage post revisions for larger sites. You may also want to see a beginner’s guide on managing your editorial workflow in WordPress.
But, if you’ll need more support, you can always Contact Us and let us know how we can help. Not forgetting, you can also share your additional opinion thoughts, contributions, suggestions, or even questions in our comments section below.

