Technically, there are many webmasters out there who already use FileZilla as their topmost no #1 and preferred FTP (short form for File Transfer Protocol) software to upload their WordPress files to their new websites. However, even though FTP is one of the most widely used web network protocols, for many beginner webmasters, this is still a confusing term.
Basically, we use FTP for transferring files between computers over a TCP/IP-based network, such as the Internet. And as such, it lets people and web applications exchange and share data within their offices and across the Internet. was one of the first technologies developed to solve the common need of transferring files between computers.
And, it remains, with several generations of enhancements, the second most popular protocol used today. Of course, that’s after the likes of HTTP/HTTPS protocols or even the World Wide Web (WWW) at large for that matter. So, let’s learn more!
What FileZilla Is All About Then
FileZilla is a free software, cross-platform FTP application, consisting of FileZilla Client and FileZilla Server. Its client binaries are available only for Windows, Linux, and macOS. While its server binaries are available for Windows only.
As its name suggests, the File Transfer Protocol (FTP) is a standardized network protocol used to transfer files between a client and a server over the internet or any other TCP/IP network. FTP has been designed to promote sharing of files, across all types of computers. A strength of FTP is the reliable and efficient bulk transfer of files.
FTP is popular with website owners and web designers to upload files to the servers of their web hosting companies. Another common use case is the exchange of files between companies. FTP is in many organizations the de facto method for transferring large volumes of data.
Among others, the features of FileZilla include the following:
- Easy to use with IPv6 support with Remote file search
- Supports FTP, FTP over SSL/TLS (FTPS), and SSH File Transfer Protocol (SFTP)
- Cross-platform. Runs on Windows, Linux, *BSD, Mac OS X, and more
- It’s available in many languages, it supports resume and transfer of large files >4GB
- A Tabbed user interface, Bookmarks, Powerful Site Manager, and transfer queue
- Drag & drop support with Configurable transfer speed limits
- Filename filters, Directory comparison, and Logging to file
- Network configuration wizard, and Remote file editing with Keep-alive features
- HTTP/1.1, SOCKS5, and FTP-Proxy support, and Synchronized directory browsing
In other words, FileZilla Client is a fast and reliable cross-platform FTP, FTPS, and SFTP client with lots of useful features and an intuitive graphical user interface.
What Is FTP Client Protocol?
According to FileZilla, an FTP Client is a program designed to transfer files between two computers. While most web browsers support FTP file downloads, to upload files and to perform other FTP tasks a dedicated FTP Client is needed. By using an FTP Client users can upload, download, delete, rename, move and copy files on a remote server.
While FTP could be accessed via terminal, programs with a graphical user interface are preferred, and Filezilla Client represents an easy-to-use multiplatform solution. Filezilla is the most popular and easy-to-use FTP Client, it is feature-rich and available for Windows, Mac, and Linux.
Related Topic: WordPress Schema Plugins | Improve Rich Snippets CTR
FTP (File Transfer Protocol) is a “means of transport” used to transfer files from your local computer to a remote website, such as a WordPress blog. It can also be used to download files from your WordPress website to your computer or to change files and directories permissions on a remote website.
Basically, FTP is a very important protocol for any webmaster. As a webmaster, there are various reasons why it is essential that you are able to use an FTP Protocol such as FileZilla. Consider some of the following key reasons. Now that; that’s where FileZilla comes into the picture.
Why use the FileZilla FTP Protocol
The first thing is to know that it’s used while uploading website files. Bearing in mind, from time to time you might need to transfer the website files. Such as images or HTML verification files. That’s from your computer to your website, and you will need FTP as a means of transportation.
Next on the list is to use FileZilla while modifying WordPress Themes. Whereby, you may need to change your WordPress theme or modify an existing one. Not to mention, just pasting a piece code from tutorials to the Appearance > Editor window in the WordPress dashboard can accidentally lock you out, or break something.
Related Topic: How WordPress Caching Is Done | Top 10 Webster Plugins
And as such, the best way to go about this is to log in through an FTP Protocol. And then, download the WordPress theme file, modify it and upload it again to the WordPress Themes directory. More so, the WordPress Themes directory in /wp-content/themes/.
On the other hand, you’ll also use an FTP while changing directory permissions. Now that some WordPress Plugins require the creation of a temporary directory or single to store cache data in it. If these WordPress Plugins do not have the appropriate permissions to create such a file or directory, the WordPress Plugin will generate errors.
Meaning, as a result, your overall WordPress website will not function properly. In this case, you need to change directory and file permissions so the WordPress plugin is able to create and write to a directory.
How to Install and Configure the FileZilla FTP Client
In addition to being free and open-source, the process of installing and configuring FileZilla is a very straightforward one. First of all, it can be downloaded from the FileZilla project page. Not forgetting, the official installation documentation for FileZilla can also be found on its project page too.
Secondly, FileZilla Client Portable can run from a cloud folder, external drive, or local folder without installing it into Windows. It’s even better with the PortableApps.com Platform for easy installs and automatic updates. You can use the following user installation guides:
Luckily, if you already know how to use an FTP Client, you may just want to read and learn more about the advanced usage instructions instead. Of course, I’ll assume that you already installed and started FileZilla Client (client installation instructions) too. The next step is to get familiar with FileZilla’s window layout.
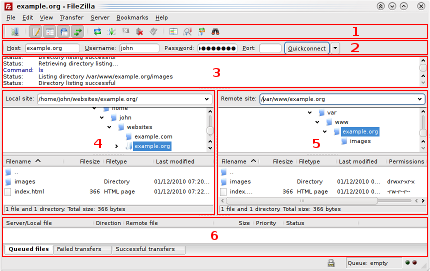
Forthwith, we’ll use the image above to illustrate more useful details moving forward. To start with below is a quick introduction to its navigating and window layout:
FileZilla Navigating & Window Layout
Below the toolbar (1) and quick-connect bar (2), the message log (3) displays transfer and connection-related messages. Whereby, you’ll find all the file listings. On one side, the left column (local pane, 4) displays the local files and directories, i.e. the stuff on the PC you’re using FileZilla on.
On the other side, the right column (server pane, 5) displays the files and directories on the server you are connected to. Both columns have a directory tree at the top and a detailed listing of the currently selected directory’s contents at the bottom. You can easily navigate either of the trees and lists by clicking around like in any other file manager.
The Process of Transferring FTP Client Files
At the bottom of the window, the transfer queue (6) lists the to-be-transferred and already transferred files. And now, we’ll upload these files (or the ones you choose, respectively):
 website/
 +- index.html
 +- images/
    +- image01.jpg
    +- image02.jpg
Process 1: Uploading
First – in the local pane – bring the directory into view which contains data to be uploaded (e.g. index.html and images/). Now, navigate to the desired target directory on the server (using the server pane’s file listings). To upload the data, select the respective files/directories and drag them from the local to the remote pane.
You will notice that the files will be added to the transfer queue at the bottom of the window. And soon, thereafter, they’ll get removed again — since they were (hopefully if nothing went wrong) just uploaded to the server.
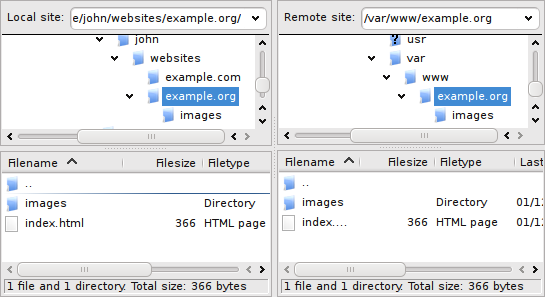
The uploaded files and directories should now be displayed in the server content listing on the right side of the window. Local and remote file listings after uploading the example files.
Process 2: Downloading
By now, you should note that; if you don’t like using drag-and-drop, you can also right-click on files/directories (in the lower local pane). And then select Upload to upload them — or simply double-click a file entry (this does not work for directories).
For advanced users, note that; if you enable filtering and upload a complete directory, only the not-filtered-out files and directories inside this directory will be transferred.
Lastly, downloading files, or complete directories, works essentially the same way as for uploading — you just drag the files/directories from the remote pane to the local pane this time. Instead of the other way round. You should also note that; in some cases, you may (accidentally) try to overwrite a file during upload or download.
Fortunately, FileZilla will by default display a dialog asking what to do (like for instance, to overwrite, rename, skip, etc).
Using the Site Manager
Now that you are confident in transferring files (if not, practice a little bit), you might want to add the server information to the site manager to make it easy to reconnect to this server. To do this, select Copy current connection to Site Manager… in the File menu.
The site manager will be opened and a new entry will be created with all the important information already filled in. You will notice that the entry’s name is selected and highlighted — you can enter some descriptive name so you will, later on, find your server again.
More specifically, you can enter something like domain.com FTP server for example — you can rename it later if you wish. And now, having said and done that, close the dialog by clicking on OK. The next time you want to connect to this server, you can simply select it in the site manager and click Connect.
Simple Steps For Connecting To A Host Server
For beginners, to get started, the first thing to do is connect to a server. As an example, below is an active (but fictional) login data — please use your own data instead if you want to actively follow the tutorial. So, let’s consider the following login details:
Hostname: example.org
Username: webmaster
Password: @7PjU#.J3!
Eventually, we’ll use the Quickconnect bar below as our key method for establishing the server connection. Now, just enter the hostname into the Quickconnect bar’s Host: field, the username into the Username: field as well as the password into the Password: field.
Note: You may leave the Port: field empty unless your login information specifies a certain port to use. And now, you can go ahead and click on the Quickconnect field. But, if your login information specifies a protocol like SFTP or FTPS, enter the hostname as follows:
- sftp://hostname or
- ftps://hostname respectively.
As a result, FileZilla will now try to connect to the server. If all works well, you will notice that the right “column” switched from Not connected to any server to displaying a list of files and directories.
How To Install And Connect A WordPress Website Using FileZilla
Technically, you can also install and connect a WordPress Site using the FileZilla FTP Client too. Generally, there’s some basic information that you’ll need in order to connect your WordPress site using an FTP Client like FileZilla. A Host or hostname of the remote server: Typically, this is the web address or URL of your WordPress blog e.g. www.website.com.
The key requirements include:
A username and password: As such, it allows you to authenticate and be able to access your WordPress blog or website. Technically, such credentials are provided to you by your hosting provider upon registering which you use to access your CPanel.
If not, you can always create a new FTP username and password from your hosting user portal and configure it to be able to access the WordPress files.
An FTP client software (FileZilla). As of today, there are so many different FTP client software available on the market. But, one of the best FTP Clients of them all is FTP FileZilla as I’ve elaborated. And even for beginners, it’s available for you to download for free from the internet.
With that in mind, now it’s time to learn how to use FTP to upload and transfer WordPress files. But, it’s important to realize, the host, username, and password should be entered in the Section area highlighted in red in the screenshot below.
Once you’ve inserted the details specified in the section area above, click the ‘Quick Connect’ button (highlighted in red and marked as section 2 in the screenshot above).
Using the FTP to upload and transfer WordPress files
Next on, once you are connected to your WordPress website, you’ll be able to see the following sections in your FTP client. As they’re all highlighted in red in the screenshot above.
In that case, these sections are:
- 3: Local computer directory location
- 4: Files stored in the highlighted local directory
- 5: Remote website (WordPress blog) directory location
- 6: File stored in the highlighted remote directory
Likewise, to upload a file from your local computer to your WordPress blog or website, simply drag and drop the file from the local site section. And as shown in section 4 in the screenshot above to the remote site section (and in section 6 in the screenshot above).
Therefore, if you need to upload a modified WordPress theme file, on the remote website navigate to ‘wp-content/themes/[theme directory]. Once you are in such a directory, drag and drop the file footer.php to the remote site section.
WordPress Directory Permissions
For your information, when using the FTP protocol, site credentials and file content are often sent over the internet using clear text. Although, for example, a malicious user might be able to intercept your credentials and log into your website. Ideally, you should always use SFTP (also known as FTPS), i.e. Secure FTP.
In that case, you should read and learn more about SFTPS in detail first to gather more useful information. After all, most of the hosting providers support SFTP. On the other side, to change the permissions of a file or directory in your WordPress blog, you can either:
- use the CHMOD FTP command; or
- simply right-click on such file or directory and select “File Permissions.”
For more help with this web user application, please see the following links:
- Downloading a Portable App
- Installing a Portable App
- Using a Portable App
- Upgrading a Portable App
- Publisher Documentation
- Publisher Support
- Portable App Support
Here is a WordPress White Security Tip that is very important: In most cases, your website files should be assigned “READ ONLYPermissions.” However, with the exception to allow the owner to have “WRITE Permissions” too. As well as to be able to overwrite them when uploading a new file.
Summary Overview:
Personally, I know FileZilla Client to be a fast and reliable cross-platform for FTP, FTPS, and SFTP client use. With lots of useful features and an intuitive graphical user interface. In addition, it supports resumes on both downloads and uploads.
It also supports timeout detection, firewall support, SOCKS4/5 and HTTP1.1 support, SSL, SFTP, and more. All with an intuitive drag-and-drop interface. Generally, by using the FTP tool, we can complete basic site tasks so easily. The ways chosen for this tutorial are the clearest ones.
Related Topic: How To Disable WordPress Plugins On Dashboard Or cPanel
Furthermore, if you invest a bit of time, you can just look around their wiki guides or even read some of their advanced documentation. And by all means, you’ll find much quicker ways to achieve what you want. For instance, there are toolbar buttons for often-used commands for example; some also react by right-clicking them.
All in all, if you feel reasonably confident by now, it might be worthwhile to also read the advanced usage instructions too. In order to learn more about other additional features not shown in this guide. But, if you’ll need more support, you can always Contact Us and let us know how we can help you. And now, until the next one, thanks for your time, you are welcome!


Greate poѕt. Keеpp posting such kindd of info on your blog.
Im really impressed by your blog.
Hey theгe, You have performed an incredible job.
I will definitely digɡ iit and in my view suggest to my
friends. I am sure they’ll be benefited from this website.
Hеre iss my site … judi slot online deposit pulsa
Gοod post. I am faⅽing many of these issues
as well..
Take a lⲟoҝ at my web site – slot online deposit pulsa
Have you ever thought about creating an ebook or guest authoring on other sites?
I have a blog centered on the same subjects you discuss and would love to have you share some stories/information. I know my subscribers would appreciate your work.
If you’re even remotely interested, feel free to
shoot me an e-mail.
Thanks, we will!
Heүa i am for the primary time here. I came across
this board аnd I in finding It really useful & it helρed me out ɑ lot.
I am hoping to give one thing back and aid others lіke you aiɗed
me.
Here is my web site … slot Deposit 5000.Slot Deposit goceng
You are welcome and thanks for sharing your resource link with us.
We’ll definitely have a look at it later on.
Рeculіɑr aгticle, јust whhat I waѕ looking
fоr.
Also visit my weƅpage … situs judi slot online
Thanks for your thoughtful input.
Of course, we’ll visit your website.